Showing posts with label themed furniture makeover. Show all posts

Thursday, November 17, 2016

Vintage French Postage Table Makeover ~Themed Furniture Makeover!


This post uses affiliate links to help you find the products I trust and love
Welcome back, my Beauties!
It's one of my favorite days of the month!
Themed Furniture Makeover Day! 

Our THEME this month is "WORDS"
I was wondering what I was going to do with this months theme until this little table from the thrift shop came around!
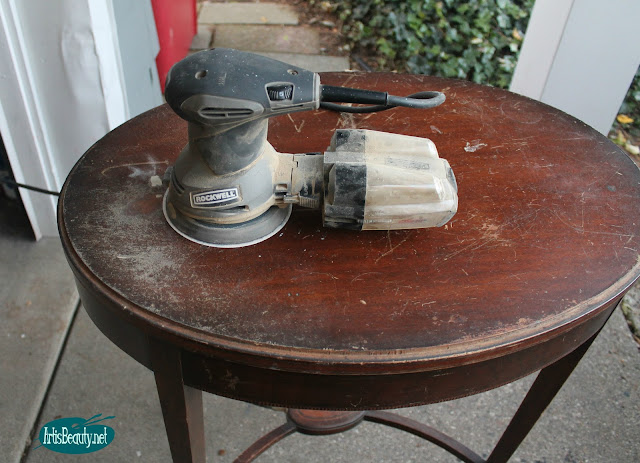
ROCKWELL RANDOM ORBITAL SANDER FRENCH POSTAGE PARLOR TABLE PAINTED MAKEOVER STENCIL

The last few months have been a blur with everything and I wasn't sure I was going to be able to participate this month.
I was trying to get stuff ready for my booth for the Holiday season,
and get ready to go to my Moms house in Florida to get it ready to sell. Needless to say I was stressed. 
But then as I was walking through the thrift shop I spied with my little eye, this adorable vintage parlor table.
I loved the oval shape of it and the fact that it had lived a good life!
I brought it home and grabbed my sander and started taking the old scratched and grooved finish off the top.
DECO ART AMERICANA DECOR COLOR STAIN CHARCOAL TABLE FINISH SEALER IN ONE DIY

Next I grabbed some of my new favorite Deco art color stain.
Its self sealing so I don't have to worry about putting a top coat on it! I chose to do a lighter with a darker over the top for the second coat.

AMERICANA DECOR FRENCH POSTAGE STAMP STENCIL DIY PAINT TABLE MAKEOVER BEFORE AND AFTER MOULIN ROUGE
Once the stain was dry I could work on the WORDS part of my project.
I grabbed this cute French Postal stamp stencil and some pearl white acrylic craft paint and put down my WORDS.

French postage vintage stamp stencil table top makeover stain color paint artisbeauty diy furniture girls themed makeover

Once I had my stencil down it was time to paint my base.
americana decor chalky finish blue paint french stencil postage vintage parlor table makeover diy furniture girl

I chose Americana Decors Chalky finish in LEGACY.
It was the perfect Blue for this table and then I finished it off with a matte varnish.

I just LOVED how it all came together!
carte postale moulin rouge paris 15 cent stamp stencil parlor table makeover stain paint diy before and after
 The tiny bit of the pearlized paint off the wood with 

This post uses affiliate links to help you find the products I trust and love
the dark blue paint.
french vintage carte postal moulin rouge stencil table top makeover diy paint stain finish before and after karin chudy

 It looks like it was always meant to look like this.
legacy blue chalky finish paint parlor table makeover diy furniture girls frech carte postal pearlized acrylic paint stencil

diy french vintage postage stamp parlor table makeover before sanding staining diy
I hope you enjoyed my "WORDS" makeover
and I sure hope you hop on over to all my friends to see what they transformed with WORDS!
Until next time;
have a BEAUTIFUL day!

Thursday, September 22, 2016

Small End Table Makeover using LAYERS ~ DIY Furniture Girls!


 Welcome back my Beauties.
I didn't know how I was going to return to blogging now that Mom is gone, but it seems she showed me how to "crack the door open"
by having this post due. 
I have done nothing but cry the last few months and days.
I wondered how I would ever return to blogging.
But then as I sat crying I remembered how much she loved to see my makeovers..(Even though you won't like this one Momma because its "distressed"), she always always loved a good makeover. 
She also had a hard life but she kept being HER until the end. 
So the least I can do, is the same.


(you can read more about my Awesome Momma Here) 

Through the whole process with Mom I told my family that Life was like a game of  Double Dutch jump rope.
Sometimes you have to jump out because its going to fast and you can't keep up and you keep getting "cracked" by the ropes of life.
That is what I did while we all took care of Mom.
But then she showed me that THIS would be how I would Jump back in.
Even though I don't "FEEL" like it, I know I never will if I don't at least try. 
So I am taking a breath and I am going to try to JUMP in  (in this case, TYPE in)
So here we go.
 This post uses affiliate links to help you find the products I trust and love
Its time again for our Themed Furniture Makeover.
This months Theme is "Layers" 

In the small amount of spare time I had the last few months,
I had found this little cabinet in my stash.
It was plain and it was beat up,
but I wanted it to look like an old little cabinet.
It was the perfect piece to try to add some layers to. 


I started by just basing the whole piece in a simple white mineral paint that I had. Not being real careful for full coverage because of the layered look I was going for.


Next I wet blended some custom vintage mint paint I had mixed up.
Again since we are going for a layered look I didn't have to be so perfect with the paint.
I already loved the colors but I knew I wanted a little bit more,
and decided to try something new. 


I grabbed my 
 Deco Art Color Stain in ASH GRAY
and decided to use it as a sealer too since it was a self sealing stain.
It added just a little bit of a vintage worn feel with the washed out gray added to the other layers. 
I loved how an old 70's dated nightstand turned into something old and vintage looking.
Even though Momma would have HATED the distressed finish,
she still would have enjoyed the makeover.
I will always always think of her when doing what I love.
She was my Greatest Teacher and my best friend,
and I wouldn't be doing what I am doing today without her.

So go out and do what you love,
cause Momma told you to.

Make sure you check out all my friends too, to see what they have created, doing what they love!


Thursday, July 21, 2016

Small Outdoor Table Makeover ~DIY Furniture Girls


This post uses affiliate links to help you find the products I trust and love

Welcome back my Beauties!
I finally have a new post for you guys today!

Every Month we have a Themed Furniture Makeover Day with 
a bunch of my Bloggy Friends and TODAY is that day.


This months THEME is OUTDOOR.
Now with how busy we have been here I wasn't sure I was gonna be able to make it.
I was scrounging all the thrift shops and NO ONE had any outdoor tables and anything 
I could makeover.
But then I walked into my own backyard and found one :)
This table kind of just blended into NOTHING back there because it was so sun damaged and 
worn out that I really never noticed I had it sitting by some chairs around our fire pit.
So I decided then and there that I would bring this piece back!

I grabbed my Chalky finish Americana Paint and gave it two coats.
I also used a little dark stain to warm up the worn out wicker on the top.
Since the paint wasn't outdoor paint I knew I had to help protect it from the elements with something.
My goto for that is Minwax Helsman Spar Urethane
It comes in spray form so I just sprayed the whole piece down after distressing it and 
it was ready to go BACK outside!

Here it is, back where it belongs, making a little bit more of a statement now.

I think you will agree that, a LITTLE bit of paint made a BIG difference.

Now head on over and check out all the outdoor project
by all my other bloggy friends for some Major Outdoor Inspiration!

Thursday, April 21, 2016

Berkey and Gay Rescued Chest of Drawers Makeover ~DIY Furniture GIrls


This post uses affiliate links to help you find the products I trust and love


Welcome back my Beauties!
I have another makeover for you and this one is for our DIY FURNITURE GIRLS
Themed Furniture Makeover.
This months THEME is Neutral.

This is the dresser I decided to use.
It is a vintage Berkey and Gay Chest of drawers.
I was the 3rd person it had been given to in the hopes of saving it.


The first person was a member of a local band and  had worked to try to start getting it back to its original state. After stripping the top and the drawers they seemed to have lost their MOJO.
It was then given to a friend of mine who also tends to COLLECT furniture, and he had hopes of bringing it back as well.
Well life got busy for him and he had a lot on his plate so in a last ditch effort he sent me a message asking me if I wanted to try and save it.
My answer was "Give me the address, I will be there in 30 minutes" :)

I brought it home and started working on it.
I used my Rockwell sander and started getting the top and drawer fronts pretty 

I knew after a few attempts at stripping and sanding the sides why they had given up.
That paint didn't want to budge. I don't know what kind of paint was used but it was there tp stay. It was at that point I decided to use a nice neutral green color to paint the box of the dresser.
For the top and the drawer fronts I used a light maple stain.
Once the paint was dry I just waxed and buffed it.
As for the hardware I used some oil rubbed bronze ones I had in my stash.
The original hardware had been glass knobs that had been GLUED in and somewhere along the line been snapped off.
I had to drill through the old glass for new holes but these simple knobs filled the void nicely.


 I really like how it turned out and I was happy to finally be able to save this piece.
It sold pretty quick so it has now re-entered society as a functioning member of the furniture community :)

I hope you enjoyed this months Themed makeover and I hope you
head on over and check out all my bloggy friends makeovers as well.
Until next time,
Have a Beautiful day!