This post is a sponsored post or uses affiliate links to help you find the products I trust and love.
“As an Amazon Associate I earn from qualifying purchases.”
Welcome back my Beauties.
I can't believe how long it has been since I have written a post.
The Holiday's have come and gone and I've been working on projects;
but documenting them and then editing and posting them seem to have gotten away from me.
I have about 20 furniture posts I need to write, but as usual I will maybe write up 2 if I am lucky :)
Also being the type of person I am I was totally distracted by another project that had been on my mind for a while and on a whim decided to tackle that instead.
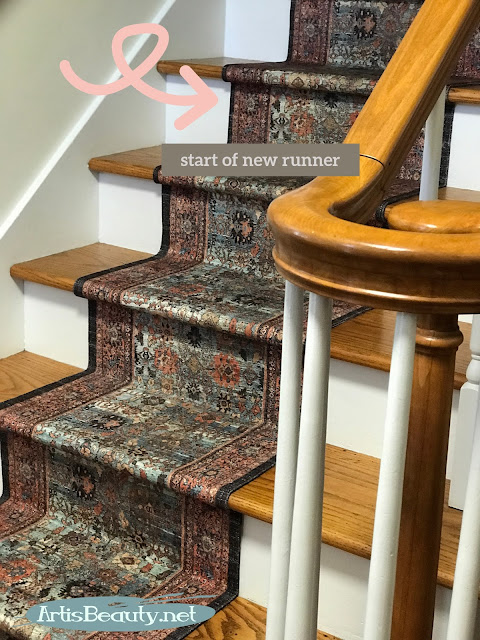
You see the runner in the above picture.
We did that back in 2012.
You can see the old post below.
When I painted my mural which you can see
I knew that the runner didn't really go well with it,
but I was ok with it because I knew it was on my mental list to replace.
It had been almost 10 years and it was starting to break down and we were always "retacking" it back down where the fabric had moved and stretched.
So, last Saturday Morning we decided to rip it up
with no replacement rug in site.
I know how both of our brains work and we needed to the
MOTIVATION of it being bare to kick us in the rear and keep us on task.
After searching and searching I couldn't find anything I liked.
You used to be able to go to Home stores and find multiple different rolls of different style runners that you could buy by the foot.
Apparently in the last 10 years that seems to have stopped.
Now all the stores around us had ONE style and color and they were all the same at every single store.
The style was not to my taste at all and I started to worry we would be bare stepped for quite a while.
As we were driving I finally had the epiphany to use runner throw rugs and cut them to fit.
I got mine at a local store for $19 each but you can find tons of other choices online.
I have linked some HERE and we ended up purchasing 6 just to make sure we had enough after cutting.and the runners I found matched perfectly.
They had that vintage Persian inspired rug feel without paying a ton of money.
Now if you read the old stair runner post you will see we rented a crown stapler from the local home store to put down the runner.
This time again knowing our personalities and the amount of other things we had going on at the time we decided to purchase
a crown nailer.
We didn't want to have to worry about working on a timeline
and getting grumpy with each other as we would have to work within a few hours and rush it.
We purchase the Ryobi 18v narrow crown stapler from the local store because I already have multiple batteries and chargers for all my other Ryobi tools and this would just be added to my arsenal for my other projects.
I have to say also, this is not an ad but that this baby didn't misfire one single time.
We have rented these types of tools before and usually you have a few misfires where the nail or staple doesn't go all the way in or some other issue but this baby worked perfectly.
Now, FINALLY onto the steps.
When we ripped off the old rug, we decided the bottom two steps needed to be restained and refinished.
This house is old and every other runner we have put up were the same size so the fact that the bottom two steps had issues never mattered.
It was always covered.
These runners were just a bit narrower so we knew we needed to fix those steps.
I hand sanded them since I didn't want a huge mess and used the same stain ratio as we used originally way back over 20 years ago when we had refinished the floors and steps the very first time.
I hand applied the stain and the finish and waited for it to dry.
While that was drying I retouched up all the Risers, Stringers and Balusters with the original paint.
After a few days we could finally lay down the runners.
Some things we had remembered from before was to use painters tape as a guideline to keep your rug straight and not end up getting off center when you lay it down.
Since its a vintage style rug it is made to look like it has slight imperfections. We didn't want that to throw us off as we were looking at it while trying to keep it straight.
Also because they were separate rugs and not one solid piece this helped us make sure we didn't move slightly up one side or another.
Another issue was the border on the rug. We didn't want to just staple border to border.
We wanted the pattern to continue on;
so when we would get to the end of one runner ( we would always make sure it ended on the riser and trim it there so it was easier to transition without disrupting the pattern)
we would use a straight edge, a very sharp blade and my very sharp scissors to cut a straight edge.
We would then staple under the lip of the tread and continue on from there with a seamless transition.
I have to say, I am in love with how it looks now. When I wake up in the morning and walk downstairs,
this is the first thing I see,
(if I ignore the laundry hamper at the top of the stairs...which as a rule...I always do LOL! )
The colors of the mural and the runner make my heart smile, and in these days, its much appreciated. :)
So there you have it.
The DIY vintage style runner using throw rugs.
I have to admit it feels like it took me longer to type up and edit this post than it did to do the actual project.
:)
I hope you all enjoyed this latest post and hopefully are staying Healthy and doing well. Until next time,



.jpeg)
.jpeg)

