Well my Beauties, its finally HERE!
The REVEAL of my finished Art Studio.
I know you have all been patiently waiting to see it
and now the time is finally here.
If you remember, this is the BEFORE.
It was suppose to be a quick project of ripping out carpet,
painting and moving in and making it my studio,
but then we found water damage......
So you know what that meant....
DECONSTRUCTION...
and then CONSTRUCTION!
You can see all of the first post HERE
You can see from this picture that I had gotten through with the hydraulic cement
and moved on to dry lock ing.
ing.
That was fun! NOT!!
Also I had sprayed my trusses.
I wanted to have and industrial feel in the room but still wanted the
white ceiling. This really lightened up the room,
but it was an ALL day process. That old pine soaked up the paint like water in the desert.
You can see on the wall where if my sprayer got clogged I would work spray graffiti on the wall
to make sure it was started back up.
(hey when you are doing mind numbing work you need some entertainment) :)
Plus all the walls were going to be painted the same white as the ceiling :)
Plus all the walls were going to be painted the same white as the ceiling :)
Now it was time for the FUN part.
I had never ever...ever never...never ever...painted faux brick before.
But I didn't let that stop me.
Did I youtube it.?..NOPE...
Did I look on Pinterest.?...NOPE..
I just grabbed a bunch of paints and started working the wall..
I first put down a almost dark purple color.
I wanted to make sure my brick had depth.
Since real old brick has tons of different colors in it
I knew I had to have LAYERS.
I roller'ed on my purple paint not being too careful.
I wanted to make sure some other colors would show through in the end.
I then went over that with a Dirty gray.
That gave even more depth to the color.
After that I mixed up a custom Brick color that I wanted.
Not to red and not too orange.
I again used a sponge roller to put that on.
I used the sponge roller after a couple different things because if you didn't fill the roller it left
little gaps and let the other colors show through, which exactly what I was going for.
After all the paint was dry I used a dark glaze to antique up the brick.
Concentrating on certain areas of the brick to make it look OLD.
At this point I was in LOVE.
But I had a vision from the very beginning.
This was one of those projects that I could see in my head before I even started.
I KNEW what I wanted this room to look like..
I just had no idea HOW I was going to do it.
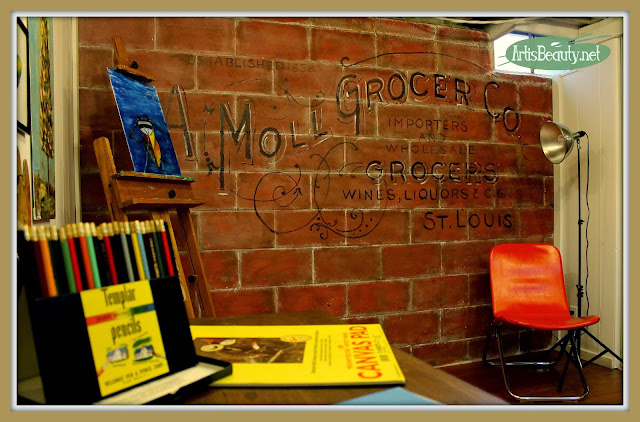
My inspiration had been old new york apt. Vintage brick with what are called "ghost signs" on the brick
This was what my head had seen when it envisioned my studio.
thanks to my friend Shelly from Shizzle.
It was finally going to be a reality.
She gave me this overhead projector YEARS ago.
Like....that's how I met her...
I was saying how I NEEDED one..
she lived by me and said...I have one..you can have it.
and we have been friends ever since.
And oh yeah...the projector has sat in my basement since then..
Hubby really LOVED that.
He wanted to get rid of it and I said..NO...I know I am going to need it..
and I DID....
I used a graphic from "the graphics fairy"
and projected it on my wall.
I grabbed my brushes and paint and started laying it down.
While the paint was drying on the ad.
I started putting down my flooring.
We had gone back and forth on whether or not I was going to paint the floor.
But we had to rip out the tack strips from the cement and it left gouges and holes where
they had been.
I found these cheap vinyl wood floor strips that are self stick at menards.
So far the only MONEY I had spent on the room was the drylock.
I had everything else on hand.
I ended up doing the entire floor for $80
and it was so easy.
We had it done in a day.
So now its time...
Time for the final reveal...
DRUM ROLL PLEASE!!!!!
TADA!!!!
Here she is..
In all her glory!!!
The paneling was painted...
the trim was up..
and I could move my stuff in.
All my furniture
was from Garage sales and Goodwill.
The Easel and Everything.
The Mid Century Mod Italian Chair . I got for 6 bucks.
I looked it up and they are Rare and sell for over $150
I am so glad I hung onto it until I could use it in my studio.
was from Garage sales and Goodwill.
The Easel and Everything.
The Mid Century Mod Italian Chair
I looked it up and they are Rare and sell for over $150
I am so glad I hung onto it until I could use it in my studio.
The kids old playroom shelves now held my art supplies.
I used Gold stencil cream to stencil on one of my fave quotes right on the wall as you walk
in and then just framed it with a gold frame.
I put my antique school desk in and started hanging some of my paintings on my
gallery wall.
and my desk is filled with all things that make me happy.
Even these vintage water color pencils.
My father in law found them for me.
I had them when we were kids.
They were my favorite pencils.
He found them NEW in the box.
Some old art teacher was selling her stuff and
he thought of me.
He is pretty sweet :)
I honestly LOVE my new art studio!
I find myself just sitting in here even when I am just drinking coffee.
It is truly "where I want to be"
It turned out exactly how I had envisioned it in my head.
I can't believe I finally have my own creative space.
A place to call my own and my refuge when I need some Me time.
I look back at the old pictures and I can't even believe it was the same room.
So from a quick makeover
to a full on construction that ended up costing me under $200
Dry lock $35
Vinyl floor $80
Trim $50
That's a lot of transformation for not so much money!
I couldn't be more thrilled.
I hope you enjoyed the reveal.
If you wold like to keep up with
what I am up to IN the MOMENT
(many who follow me on instagram got to see previews of this room)
You can follow me on many of the platforms.
Just click on the links and you can just click follow.
I would LOVE to have you follow me.
Until next time,
Go make someones day BEAUTIFUL


0 comments:
Post a Comment