Showing posts with label projects. Show all posts

Wednesday, August 30, 2017

$8 garage sale Harlequin dresser makeover


THROWIN IT BACK TODAY, WITH AN OLD MAKEOVER I ORIGINALLY DID OVER 3 YEARS AGO!
ENJOY!
Welcome Back my Beauties!
Sorry I have been neglecting you lately
but as you know I am working on my art studio.
I have LITERALLY been working night and day on it.
So much that I have not had much time to post furniture 
makeovers. 
I finally had a little while to sit and edit some pictures
so I would put up a makeover for you!.

This post is a sponsored post or  uses affiliate links to help you find the products I trust and love
This is what it started like.
The pictures actually make it look better than it did.
It was terribly beat up on the sides and the top.
This was the piece that I picked up when we were camping this summer
and my Hubby was oh so THRILLED to help me pack
in the suburban.
We had hit a church garage sale and there was NO WAY I was passing up
an $8 dresser.
He knew it was a lost cause so he just kept his mouth shut while we
crammed it in the truck. (my brother in law did not and actually sat laughing
and ribbing my hubby about us jamming a dresser into our truck)
Thanks GARY! :)
Anyway, I let this baby sit for a while in the garage and finally got motivated to work on it.

I had no idea what I was going to do with it,
just that I needed to fill some booth space so I had to get to work. 
I started by painting the whole thing a simple creamy yellow. 
Very light and very simple.
Well, You know me.
It wasn't ME... So I got to thinking.
What could I do to Beautify this??
I saw my harlequin stencil sitting on the workbench and the rest is history.
I grabbed some gold craft paint and got to work on the stencil.
I didn't want to overdo it and I also made sure that the stencil lined up all the way down the 
drawers as to not get to much of a dizzying effect.
When it was all dry I actually put the original hardware back on.
I loved the look of the classic hardware with the
classic harlequin pattern.
I waxed and buffed the whole thing and she was ready for her closeup!


I couldn't be HAPPIER with how she turned out.
Its not my normal style but it was fun to do something
different.
I hope you enjoyed this latest makeover.
I am soooooo close to being finished with my 
art studio but I don't want to do the full reveal 
until we get the lights up
and I can take PROPER pictures.
You can see the BEFORE Here!
and since I love ya 
I will show you a little Sneak Peek of 
the progression. :)

Hopefully I will be able to get the REAL photographs of the full reveal next week!
Until next time,
go make someones day BEAUTIFUL!!!!

Wednesday, April 6, 2016

Poppy flowered Night stand


This post uses affiliate links to help you find the products I trust and love


Here is another project that I decided that I want to put my own personal touch on.


My girlfriend gave me this nightstand that used to be her hubby's and it as is the usual with me; been sitting in my shed..:)  

Well, this weekend we got some BEAUTIFUL weather, so I painted a bunch of furniture. This is what it looked like, just painted.

Cute all on its own, but not good enough for me....:)
I LOVE poppy's...I don't know what it is about them...I just love them...so I decided that I wanted this to have a poppy on it. I looked at tons of pictures online and got one I thought would work for this nightstand. This is not the type of picture you can "just transfer" This one had to be painted. So I got to drawing it on, and started painting.


Just so you know, artists don't always use fancy brushes and such...one part of the center flower needed cute little perfect circles. Guess what I used for that????? A q-tip...that's right....this makes perfect little circles...:)
This is before I added more shading and distressing.....
and here she is all finished...I hope you like it....I had so much fun..listening to music and painting on this rainy windy cold day...
I hope you have a BEAUTIFUL day!!!!!


Posted by Picasa


This post uses affiliate links to help you find the products I trust and love

Sunday, April 3, 2016

Before and After MANLY...(handsome) Dresser Makeover


This post uses affiliate links to help you find the products I trust and love
before-and-after-custom-dresser-makeover-collage-artisbeauty.net
Good Morning my Beauties...
Its Makeover Monday again and this time I have painted something for the 
MEN. (raise your hand if I have male readership..:)
I often paint lots of things in colors that are not MY taste but those of the people buying my
furniture. They are not for me so I figure I will paint them the colors my customers want.
This is one such case.


I had picked up this dresser a while ago at Goodwill and let it sit in my garage...as is my NORMAL M.O.  :) Hubby just LOVES that ...
I usually let them sit so that I can be inspired by HOW  they want to be painted.
This dresser sat and sat, because honestly I didn't want to do another GIRLY dresser.

 I started to PREP it one day this summer BEFORE we started to paint our house. 
I thought, I will just get it READY so that when I am INSPIRED it will be ready to paint.
 I filled the old hardware holes since the people who had donated it had already changed the hardware and were only using ONE hole on each side. I sanded those down once they were dry and sanded down all the nicks and scratches and watermarks.  It was at this point that inspiration struck.
 I realized at that moment this was meant to be a HANDSOME dresser; NOT a girly dresser. :)
I started mixing up some fun paint that I like to call either GUN METAL GREEN or
SHARK FIN. Its so hard to decide on the name because it is a custom mix of blues and greens.
I painted the whole thing with this custom color in a very thin coat. 
I wanted the wood grain to come through just a bit to keep that almost WASHED finish.
I waxed it and buffed it and was thrilled with how it came out.

artisbeauty.net-custom-green-close-up-dresser-copper
 I then went into my treasure trove of knobs that I save from every single project I have ever done (another think the old hubby is thrilled with) and found the exact number of copper knobs.
Giving it that even more Masculine feeling.
 I am happy to say that it also SOLD,
before I even had a chance to put up this post.
SO I guess my instincts were right to wait for HIM to tell me he wanted to be 
HANDSOME..... 
I hope you enjoyed this weeks makeover!
Make sure to come back tonight to link up to the
Twirl and Take a Bow Link Party to show us what YOU have been working on
for a chance to be FEATURED!
Until next time.
Go make someones day BEAUTIFUL.

Monday, March 21, 2016

Birch Trees Painted piano bench


This post uses affiliate links to help you find the products I trust and love


 I just found this OLD post from way back in the day and I thought it would be a fun walk down memory lane to look back at one of my first blogging projects.
ENJOY!

I gotta tell you, I have been having so much fun this week. Don't get me wrong, crafting and painting furniture is fun, but when I get to "do a painting" on furniture.....It makes me KA-RAY-ZEE Happy...:)

I have had this piano bench sitting in the shed since approximately.....UMMM....FOREVER!!! (actually since the first day of summer vacation for the kiddos) There it sat with more and more of my crap, oops I mean STUFF on top of it. 
Then the other day when I was painting my dresser I thought, I should really "JUST DO SOMETHING" to that thing....:) 
So I gave it a quick sanding and coat of primer and when it was dry, a coat of steeple gray paint.
 Then it sat.....................AGAIN...............in my garage.   I was thinking: oh I will just quick paint a graphic on it or something. But I have not been painting pictures as much as I would like too, and while I was thinking about how I would love to paint some birch trees, It came to me....Why the heck couldn't I just paint them on the bench. DERRRRRRR!!!! :)

And so it began.
 I painted my backgrounds and shadows on the tree trunks, just like I would in a painting. I then I left for my daughters orchestra concert.

By the time I got home it was dry enough to start working on the bark...and with the rough shape that the top was in, it worked out perfect for the texture of the birch trees. 
I finished out the outside edge in black so that it is framed out
. It is now not only a bench, but a work of art. I am so happy with how it turned out.
I hope you all have a BEAUTIFUL day!!!!


Tuesday, December 29, 2015

Humpty Dumpty ROADSIDE RESCUE Desk and Chair


Good morning my Beauties. If you can remember
this little number.   I got it as a Roadside Rescue.


This is what it looked like in the beginning.           AFTER I
found all the pieces and started putting it
back together.


 I only had to fight off a couple of Raccoons that night while the hubby
and I went through all the stuff on the curb in the dark.
We actually had to dig and find each piece to each drawer.
Like I said...Had to fight a few raccoons.

So the next day in the light I started re piecing the desk back together again...(hence HUMPTY DUMPTY)


You can see...It was quite a bit of work, but oh so worth it.


See this chair...got that too...it goes with the desk..It was SCARY!!!


Here it is..all back together...and getting sanded before the paint.

 I got this great Blue Oops paint
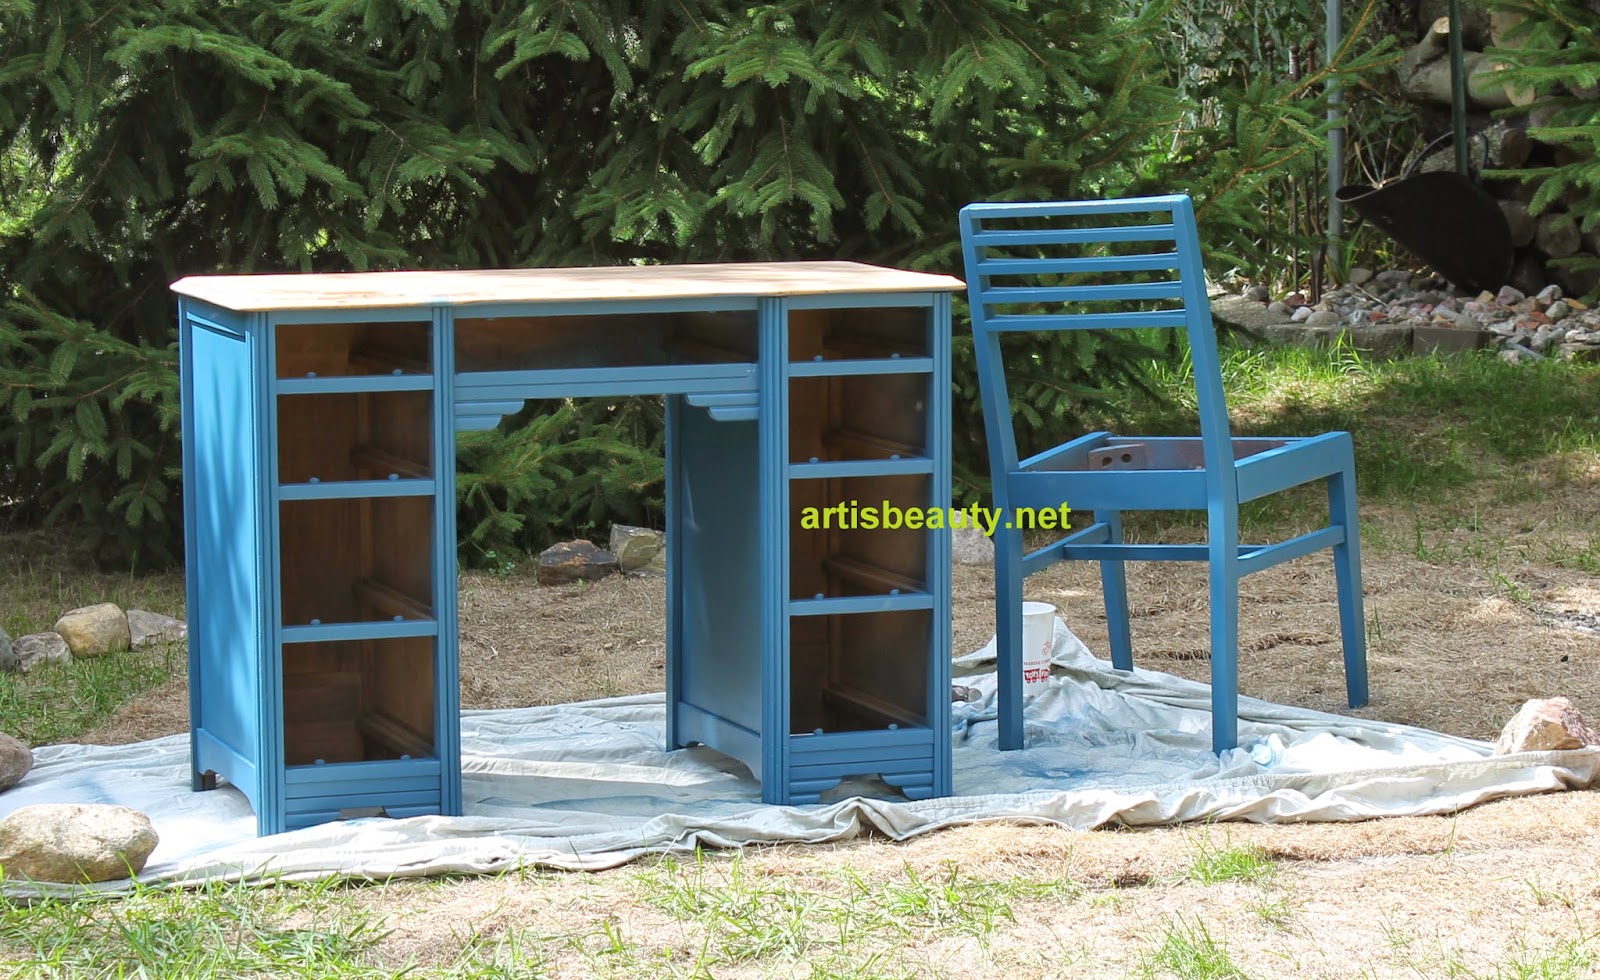
. It was $2.....So far...I have only spent 2 bucks and lots of sweat...:)


When it was painted I finished the top with a deep dark stain and then recovered the chair in a great
French fabric.


One of the other things I had to do..soak the handles in Ammonia and scrub and sand them
back to their original look.


Here it is...All finished... WHEW!!
That was a JOB,
but guess what...Before I could even post this...IT SOLD...
SQUEEEEEL!!!!
So excited!!


I hope you all have a BEAUTIFUL day!!!
Posted by Picasa


Thursday, December 17, 2015

From Dirty Blonde to Gorgeous Green Buffet Makeover


Hello again my BEAUTIES!
I have a fun and funky makeover for you today.
I got this old Blonde buffet at a local Thrift Shop.
I loved the lines of it, but the Finish not so much.
It was the traditional old blonde color that had seen its day.
It was discolored in many spots with lots of stains and scratches.
I loved the cool pulls but only 2 of them were left on the piece.
All the rest had broken off.
I was trying to decide what color I wanted this piece to be while I also figured out
what type of hardware I wanted to put on it.
Decisions Decisions...

 I finally decided to use my arrow pulls I had been hoarding (I mean saving)
I had to drill new holes for the hardware since the old pulls had been dropped into the tops of the drawers.
I changed the top of the buffet by using my General Finishes Java Gel stain.
It gave it the nice deep color I was looking for.

Then it was time for color. I decided to mix up a custom green and wet brush in some other deeper and lighter greens.
After it dried I waxed and buffed it and added on the new arrow pulls.
 I was in LOVE!! It was one of those moments where my daughter and I were talking about what piece we could take out of our house and replace this with it.
She kindly offered her room..:)
I rejected her KIND offer. :)


I love how much the colors changed the WHOLE look of this piece.

I quick brought it into my booth before my daughter could change my mind.
:)
Good thing too...cause it SOLD already..
Bitter Sweet, 
but happy to know it was going to a good home.
I hope you enjoyed this fun makeover
Until next time..
Go Make someones day BEAUTIFUL!

 www.patinaparadise.com