Showing posts with label artwork. Show all posts

Friday, December 29, 2017

Favorite posts of 2017 from ArtisBeauty.net

artisbeauty.net favorite posts of 2017 furniture makeover diy blogger before and after rustic before and after farmhouse bohemian eclectic decor
Happy New Year, my Beauties!
Well....almost.
I wasn't going to do a "best of" but I am glad I finally got around to looking back over this past year.
I actually hadn't felt like I had accomplished much this year,
as I seem to be in a continual mode of trying to play CATCH UP with everything else going on. 
But once I started looking back it felt good to see how much I had accomplished over this last year.
I will show you a highlight below and all you have to do is click on the link for each picture if you want to see the full transformation.


This post is a sponsored post or  uses affiliate links to help you find the products I trust and love


http://www.artisbeauty.net/2017/03/emerald-green-rescued-dresser-before.html
One of my personal favorites was this 
Emerald Green Roadside Rescue Dresser Makeover
If you read the post you will see that my husband had actually been out on a walk when he spotted it out in some ones trash and quickly ran home to ask me if I wanted it.
You can guess what that answer was!


http://www.artisbeauty.net/2017/03/mid-century-mod-dresser-makeover-mcm.html
Next was this free dresser from a friend of mine that became MY new dresser for my bedroom. This
Mid Century Mod Dresser Makeover 
was done specifically for me to KEEP.

http://www.artisbeauty.net/2017/03/mid-century-mod-dresser-makeover-mcm.html
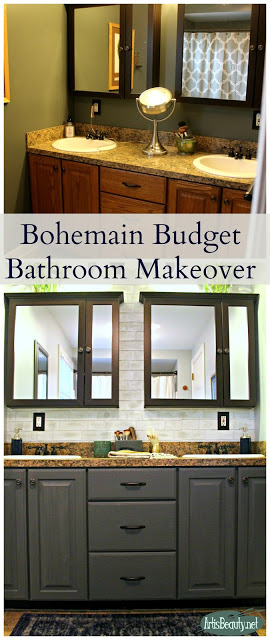
Next, was my Bohemian Budget Bathroom Makeover
We have lived in our home almost 20 years and after all that time I finally couldn't take the golden oak cabinet any longer. 
Also I could kind of trust the kids to maybe not decimate it now that they were older, LOL!


http://www.artisbeauty.net/2017/02/creating-eating-nook-with-ikea-benches.html

By far, my favorite makeover this year has been my corner area where I Created an Eating Nook with IKEA benches
As I said before, we have lived here almost 20 years and this corner has been a pain for me for just as long.
I was so excited to finally figure out a way to properly use this space.


http://www.artisbeauty.net/2017/06/simple-stencilled-side-table-makeover.html
I know from looking at this little table it doesn't seem like that big of a makeover but if you click on the link you will see what a little BEAST this free table was.
This Simple Stenciled Side table Makeover 
had me testing my nerve and even gave me a few splinters.


http://www.artisbeauty.net/2017/09/rolling-kitchen-cart-makeover-using.html
I really liked the transformation on this, because it took it from outdated to SOLD in about a day.
You will see what products I used to transform it when you click on the link for my
Farmhouse Rolling Kitchen Cart Makeover
and see how I even used a LAXATIVE for a great finish! :)


http://www.artisbeauty.net/2017/12/updating-farmhouse-style-table-and.html
And last but not least,
even though I had many more furniture projects this year,
this
Farmhouse Table and Bench Makeover 
was one of my most recent, and I was thrilled with how easy it was able to go from orange and outdated to fresh and fun.


http://www.artisbeauty.net/2017/12/favorite-posts-of-2017-from.html

As always, I am so thankful for all of you that have been following me along all these years.
These last few years have been a little bumpy with my mom and all and recalculating and making more time for the things I want out of life, but I am always so incredibly grateful that I always have had all of you BEAUTIFUL people who encourage me every day with your kind words and interest in what I do.
May the new year bring many blessings to all of you,
and may you look back to see all the good things in your life!
As always, Have a BEAUTIFUL day and a wonderful NEW YEAR!

Tuesday, April 18, 2017

DIY Medallion Wall Art from an Old Shelf


Deco art chalky finish paint and old shelf used to make a medallion print wall art diy blogger boho chic

Welcome back my Beauties. 
I have been a painting fool, trying to build up a finished inventory again now that we are back from spring break.
One of the fun things is to find old pieces of scrap wood and make fun wall hangings and artwork.
So today I am going to show you how I took an old shelf from an entertainment center and created a fun bohemian fleur medallion artwork.
First things first was to give the old square shelf a quick coat of Deco Arts Chalky finish paint in Preservation

This post is a sponsored post or  uses affiliate links to help you find the products I trust and love

http://amzn.to/2pvyZ9x


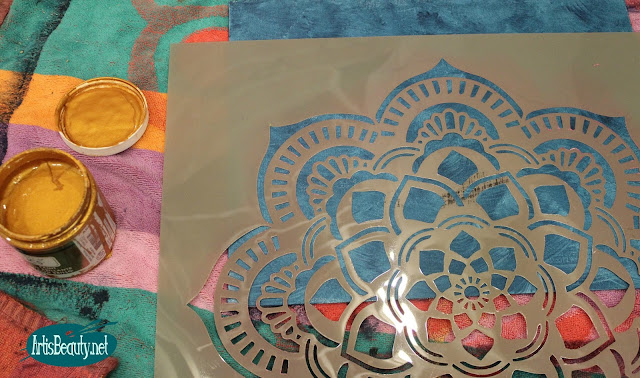
Once the board was dried, I grabbed my Fleur Medallion Stencil and laid it on top of the board.
deco art chalky finish paint fleur medallion stencil diy artwork boho chic stencil brush paint
I used my stencil brush to lay down my chalky finish paint in Keepsake. I loved how the green POPPED on top of the deeper blue paint.
deco art americana acrylic sealer matte finish diy fleur medallion artwork stencil

Once the whole piece was dry I distressed it 
and used Americana's Sealer in Matte finish to seal the piece.
diy fleur medallion boho chic bohemain home decor wall art deco art americana
Once it was all dry I drilled a hole in each corner and fed some jute cord through and tied them off so if I wanted to I could hang the piece.
diy fleur medallion boho chic bohemain home decor wall art deco art americana
For picture purposes I chose to just set it on my mantle.


diy fleur medallion artwork from old shelf and paint and stencil boho chic bohemian decor
I love how easy it was to take this old beat up board that used to be part of discarded entertainment center, and turn it into a piece of art that was saved from the scrap pile.
I hope you enjoyed this latest upcycle makeover.
Hopefully soon I will have the furniture makeovers photographed and be able to show you their transformations.
Until next time,
have a BEAUTIFUL day!

Wednesday, March 8, 2017

Mandala Painted Table Makeover


BEFORE round wood table rescued worn turned boho chic mandala artwork table
Welcome back again my Beauties!
I am once again playing catch up with makeover posts.
I have had this little table sitting in my basement, PAINTED for a few months now.
But never had a chance to photograph it.
But we finally got a sunny day here in MICHIGAN and I was finally able to get some pictures.
So here without further ado is my Mandala Painted Table Makeover.
MANDALA STENCIL DECO ART AMERICANA DECOR BOHO CHIC PAINTED FURNITURE MAKEOVER DIY
This post is a sponsored post or  uses affiliate links to help you find the products I trust and love
You can see from the first picture that the table was in rough shape.
All but a tiny piece of the original veneer was left on the top which only took a swipe with a putty knife to get off.
Once I did that I just sanded the top and got ready to paint.
I decided to mix up a custom charcoal gray paint for the base and gave that a couple coats.
Once it was dry it was time to pull out one of my new favorite stencils.
You may remember I showed you how to make some DIY MANDALA ARTWORK a few weeks back.
Well I decided to use that same stencil for this table top.

deco art americana decor mandala 18x18 stencil art gray pink and white painted table makeover

Since the table was a charcoal gray, I decided I wanted to make the mandala POP so I chose a color I very very RARELY use!
PINK..
I am not a PINK girl but I just loved how it plays so well with deep grays.
Since I didn't want it to be ALL PINK I just did an OMBRE effect and gradually added white as I worked my way to the center of the stencil.
ombre pink and white mandala artwork on charcoal gray grey round table top artwork diy painted furniture boho chic

And this was how it turned out.
I sealed the top with some satin poly 
and it was good to go.
boho chic mandala stenciled table makeover artwork diy furniture makeover gray pink and white eclectic decor
I have to say it felt good to step out of my comfort zone of color choices.
BEFORE AND AFTER MANDALA STENCIL HAND PAINTED ROUND TABLE MAKEOVER

I mean, you know how much I love COLOR but some colors just aren't my normal,
and it was really fun to try something different.
Life would get pretty boring otherwise.


Hand painted furniture. Boho style. Mandala design. Bohemian furniture.
I hope this post inspired you to 
go outside of your normal 
and try something new.
You will be glad you did.


Just as long as you don't forget to keep stopping by here
after you tried something new!
:)
Until next time,
Thanks for making my day BEAUTIFUL!

Sunday, February 5, 2017

DIY Quote ART without a cutting machine


home decor Diy Large scale Quote art without a cutting machine BOHO CHIC drink well travel often wanderlust diy
Welcome back my Beauties!
I have been working on a Kitchen makeover (which I am not ready to show yet) and decorating a new space in it.
So today I am going to show you how to make the LARGE 
DIY Quote art without a Cutting machine!
Now be warned. This project takes patience; but if I (the least patient person in the world) can do it, so can you!
This post is a sponsored post or  uses affiliate links to help you find the products I trust and love

First off, decide on what quote you want.
I loved "eat well travel often" but my husband has been a homebrewer for 20 years and he wanted "Drink Well Travel Often"
so I decided that would be a good quote too. 
Next, since it's LARGE Art, I chose a 
You can Order them or do like me and use your Coupon at the local craft and hobby store and get them CHEAP!
I think mine ended up being $18 with coupons.
Then you choose your stencils. I went with

Again, on sale and with coupon I think my stencils cost me $4

http://amzn.to/2kzKfCh
And last, you will need some cheap acrylic paint.
I had that at home but you can buy it for about a buck at the local craft store

That puts my project just under $25
Pretty cheap for some large scale art!

drink well travel often word art large scale diy canvas art boho home chic decor

Now here is where the patience is gonna be needed.
First lay out your stencil quote to decide on spacing.
I will tell you honestly,
I had planned on having the artwork be Portrait style,
but in my usual fashion, I changed my mind on what stencil I wanted as I was walking out the store not thinking about the fact that the new letters were bigger than the original ones I had and didn't measure those out in the store..
I got home and realized that but a quick fix was just to turn the canvas the long way...WHEW!


drink well travel often giant word art diy stencil canvas paint
Next step is for more patience.
I have been making signs for years and one of the biggest tricks is to start in the center. 
It's kind of like when you do tile work. You measure out from the middle. 
So just like ALL things in Life....Find your CENTER 
and work from there.
Since "DRINK" was a 5 letter word I knew the letter "I" would be the center. 
I put that in the center and painted that one on.
Then, since you are dealing with WET PAINT you have to wait for it to dry before you lay your next letter down so you don't smudge.
(I told you patience was KEY)
I will also tell you that I sped things along with a blow dryer.
I told you...I am not PATIENT! :)
So each letter goes on, gets dried and you work out from the middle.
drink well travel often BOHO WORD ART eclectic home decor do it yourself diy wall art

But the patience paid off.
I now have my LARGE DIY Quote Art 
hanging in my new space in my kitchen.
(I promise to be back SOON with that space)
I hope you like this DIY and I can't wait to see what you make!
Until next time,
Go make someone's day BEAUTIFUL!

Monday, January 30, 2017

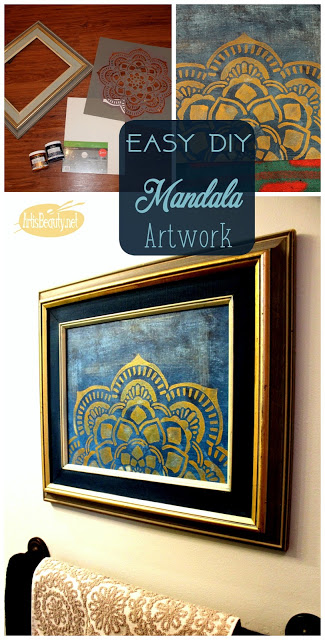
EASY DIY Mandala Artwork


Boho Style easy diy mandala artwork canvas metallics gold and indigo

Welcome back my Beauties.
Last week I showed you my Budget Bohemian Bathroom Makeover and I promised to show you how I made the art work for my bathroom.

boho chic easy diy bohemian budget cheap bathroom makeover
This post is a sponsored post or  uses affiliate links to help you find the products I trust and love
So here is how to make your SUPER Easy DIY Mandala Artwork.

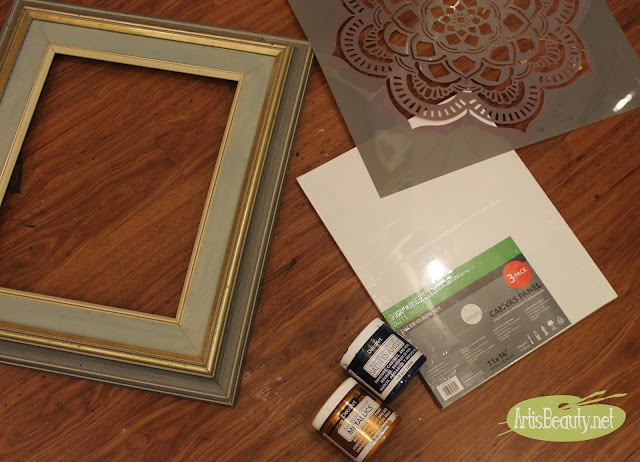
thrifted frame deco art mandala stencil metallics and satin enamels paint boho chic eclectic decor
To start you will just need a few basic items.
You don't need to use the same colors I used and you can "FREE STYLE" all you like.
This is just a guideline.
For my bathroom I chose Deco Arts Satin Enamel in Denim
and Deco Arts Metallics in Gold.
I have had this thrifted frame sitting in my stash for years.
I also had my 16x20 canvas panels in my stash.
The PERFECT fit for my frame. Can you say CONVENIENT?
I wanted something fun and eclectic so I chose to use my 

boho chic decor diy easy mandala artwork canvas paint stencil


Now to cover your canvas you could really use any brush you wanted.
Since I was rushing and I wanted large texture for my background I actually just used my 
It's the same brush I use for furniture.
I simply dabbed my brush with some of my blue paint and made LARGE swirling brush strokes over the whole canvas.
I wanted it to have depth so I didn't fully cover my canvas. I wanted some of the white poking through behind giving it texture.


deco art easy diy stenciled chic boho style mandala canvas artwork


Once the canvas was dry I grabbed my Stencil
and decided where I wanted it.
I knew I wanted to cover almost 3/4s of my canvas so thats where I laid it.
Then I grabbed my metallic paint and a stencil brush
and brushed on my pattern.

This is what I had after the gold. Notice all the texture now that its dry.


Now to make the frame feel a little more FRESH and FUN
I just used the same blue paint and filled in the canvas part of the frame.
It went on darker because of the different material and I LOVED the richness it added.
Once everything was dry I popped it in the frame and it was ready for its close up.
easy diy mandala artwork boho chic painting canvas bohemian eclectic decor

I love having something fun and eclectic in the bathroom.
I also like having something that is one of kind.
easy diy mandala artwork boho chic painting canvas bohemian eclectic decor
See, I told you it was EASY!
I can't wait to see what you guys make!
Until next time,

Have a BEAUTIFUL day!

Friday, December 30, 2016

My top 10 Favorite Posts of 2016

l
repair woodwork hardware painted furniture makeover boho chic bohemian style color fun stencils artwork hardware diy blogger blog artisbeauty karin chudy
Happy New Year my  Beauties!
Its that time of year when I look back on the projects of the past year.
As you know, this has been a rough year for me emotionally, loosing my Momma and all
so It was kind of nice to look at some of the small accomplishments I managed to finish in the midst of all that. 
In this post I will show my  top 10 Favorite posts of 2016.


This post is a sponsored post or  uses affiliate links to help you find the products I trust and love

One of my favorite colors has always been GREEN. Sometimes you just have to paint something green and this Old Art Deco Mid Century was just that piece.
I love what it became and if you click over you can see what it looked like BEFORE!
http://www.artisbeauty.net/2016/03/art-deco-vanity-and-bench-custom-green.html

Next up, was updated a dresser with Java Gel stain and General Finishes Paint.
I love how the stain was able to give the richness back to the drawer fronts and the paint helped to highlight that. You should have seen what it looked like Before!  

http://www.artisbeauty.net/2016/09/updating-dresser-with-general-finishes.html


Next up....This GORGEOUS Steel Blue Buffet.
If you have been following me for a while you know that I have a huge LOVE of the color BLUE!
This Buffet looked so sad before, but after this POP of color it totally transformed the piece~
Come see the BEFORE and see the transformation!


http://www.artisbeauty.net/2016/05/steel-blue-antique-buffet-makeover.html


Now this next piece really tested me. 

I still remember every part of this makeover mostly because I am pretty sure I still have old veneer somewhere on my body. You wouldn't believe the work that went into transforming this old dresser into a Mint and Paisley lace farmhouse style dresser.
Just click on over to see ALL THE WORK that when into this makeover and what it looked like BEFORE!


http://www.artisbeauty.net/2016/03/mint-and-paisley-lace-farmhouse-style.html 

 Then following on the MINT feeling was this cute
Even though it wasn't nearly as much work as the above dresser I liked taking this from a very plain 
dresser and giving it some UMPH with a little stencil some paint and some adorable hardware.
Head on over here to see what it looked like BEFORE.
http://www.artisbeauty.net/2016/04/gray-and-mint-ikat-stencilled-dresser.html

 Now some makeovers barely made it to be show this year with all that was going on in my life.
This one just barely made it. In fact the lumber which this came from and the room makeover that it came from haven't even been posted about yet. I made over my sons room and we used his old Bed to make this Rustic Farmhouse style kitchen table.
Come see how this was made from a Bed by clicking over HERE!
http://www.artisbeauty.net/2016/11/how-i-built-vintage-rustic-farmhouse.html


Next up is one of my ALL TIME FAVES! Oh boy, you wouldn't believe HOW BAD this desk looked before. I mean a neighbor gave it to me free because she was going to throw it out.
I gave it a little TLC and this Gray and Copper Desk Makeover became one of my most popular makeovers!
Sometimes I love pieces and others don't see the Beauty I do, but this piece seems to have been popular with people BESIDES me. 
Head on over to see HOW BAD it was BEFORE! and how it was transformed!


http://www.artisbeauty.net/2016/08/gray-and-copper-desk-makeover-fab.html


Now here I am back again with some more Veneer work on this Beauty.
Just like the Mint farmhouse dresser this piece required more work than others. 
This Bruised and Battered turned Blue Beauty dresser makeover  
Didn't allow me to just lightly sand and put down some paint.
No, this baby needed repair. 
You can head on HERE over to see how bad this Beauty was before I got my hands on it 
and see what I had to do to transform it!  
http://www.artisbeauty.net/2016/02/bruised-and-battered-dresser-turned.html

 Now this Makeover, is one that never left my home.
I painted this with my Momma's eyes as my inspiration and when she passed there was NO WAY I could let it go. It now sits in a place of honor in my living room holding the afghans and blankets she made me and a constant reminder of her love and beauty.
This little Bohemian Blue Dresser with French Graphic will forever hold a piece of  my heart.
 You can see what it looked like BEFORE here!
http://www.artisbeauty.net/2016/10/bohemian-blue-painted-vintage-dresser.html

And last but not least, one of the last makeovers I was able to manage this year.
The Boho Style Green and Copper Dresser makeover was the last piece I managed to get to before all the business of the holidays took over. But it felt good to paint again and be creative. 
Now that you have seen it made over you won't even believe what it looked like BEFORE!


http://www.artisbeauty.net/2016/11/boho-style-green-and-copper-feathered.html


Now that concludes my favorite posts of 2016!
I want to,  as always THANK YOU for following along, even with the sporadic posts these last few months.
Your words of kindness and beauty truly did help ease my broken heart these past few months.
Even though I will probably meet most of you, please know that I feel I KNOW you just from your kindness alone.
The world of blogging can be nebulous, with faceless readers clicking in and moving on to the next thing, but I feel my TRUE readers when they are here. 
The little comments here and there can sometimes be the  little bit of  LIGHT that I needed in my day! 
So as always, 
Go make someones day Beautiful!
Happy New Year!