Showing posts with label crafts. Show all posts

Wednesday, March 21, 2018

Simple and quick Cute Silhouette Easter Bunny art


 Sorry FOLKS, this is a REPLAY week.
So here is a blast from the PAST!
I have plenty to share, Just not plenty of TIME!
So since Easter is around the corner I thought I would show you a quick and easy repurposing craft.

Good Monday Morning my Beauties! I hope you had a wonderful weekend.
I am busy busy busy, getting the new booth ready for the Grand Opening on Friday March 1st.
I am so excited not only for myself but for all the other NEW vendors coming into the store.
There are a ton of people starting out for the first time..living their creative dream.
Whats not exciting about that?!

Anywhoo..in order to start stocking up on more things I knew I had to get started on my smalls
for the booth. So I thought why not make some Easter stuff.
I had this old board that I got at Goodwill.

I painted over it with my CeCe Caldwells paint.

I then went to my silhouette program and printed out some bunnies.
I used just plain old contact paper to transfer the cut outs to the board.
I then used 3 different colored craft paints to paint in the bunnies.

Here they are, cute little Bunnies, ready for Easter!

One project down, only about 500 more until I am ready.
I hope you enjoyed this little tutorial!
Have a BEAUTIFUL day!
Posted by Picasa


Thursday, November 30, 2017

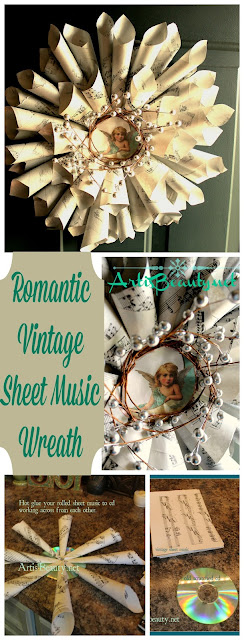
Graphics Fairy Sheet music wreath using OLD CD


I love resharing this wreath!
Come see how easy it is to create your own!
(You can follow me on INSTAGRAM to keep up with what I have been working on) so I thought I would share an Oldie but a Goodie!
Here is one of my favorites. My sheet music Christmas wreath.!


diy craft vintage sheet music turned christmas holiday wreath
Good Monday Morning my Beauties! Well Its official...
I have caught my kids CRUD. :(  Luckily
I had gotten this project I have been wanting to do done
before the wonderful virus set in.

I have a stock pile of old sheet music that I had gotten at a bag at a thrift shop for $1.
Some of its really old and I decided not to touch that stuff, but the rest is 70's and 80's classical.
So I thought I would use those to make my wreath. BUT I didn't have a wreath form. It hit me while
I was in my CRAP/CRAFT room that I have a bunch of old scratched Cd's in there.
They are round and sturdy and I thought an added bonus that a MUSIC wreath was going to be put on an old CD :)
(Bonus if you don't have sheet music you can go over to the Graphics Fairy and
she has vintage sheet music you can print off)

I started rolling my half sheets of sheet music and hot gluing them when they were rolled.
I then hot glued them to the CD working in a opposite pattern. (kinda like how you take the lug nuts off a tire..:))

I kept adding layers and then as I wanted it fuller I cut the half sheets in half again and made a middle smaller rolled section. When that was set I went over to the Graphics Fairy and got this cute little Vintage Angel

I added her to the middle using my hot glue gun and then used a piece of some silver sprigs that I had left over from Christmas Decorating.
copied vintage sheet music craft old cd hot glue gun graphics fairy christmas holiday wreath decoration
My Christmas Sheet music wreath now hangs on my front door.

I love the adorable little greeting that she is to people coming into our home.
Well, thats all I have for today..Hopefully by the time you read this
I am on my way to feeling MUCH better.
I hope you all have a BEAUTIFUL day!
Posted by Picasa
 The Graphics Fairy

Monday, January 30, 2017

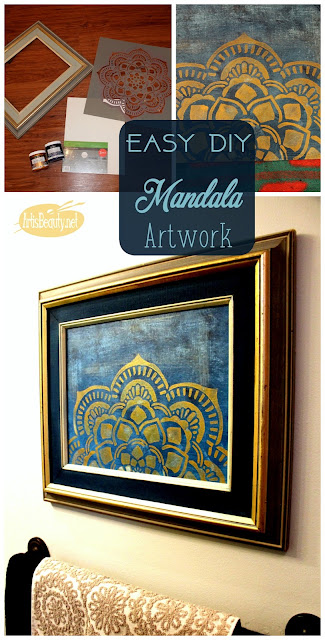
EASY DIY Mandala Artwork


Boho Style easy diy mandala artwork canvas metallics gold and indigo

Welcome back my Beauties.
Last week I showed you my Budget Bohemian Bathroom Makeover and I promised to show you how I made the art work for my bathroom.

boho chic easy diy bohemian budget cheap bathroom makeover
This post is a sponsored post or  uses affiliate links to help you find the products I trust and love
So here is how to make your SUPER Easy DIY Mandala Artwork.

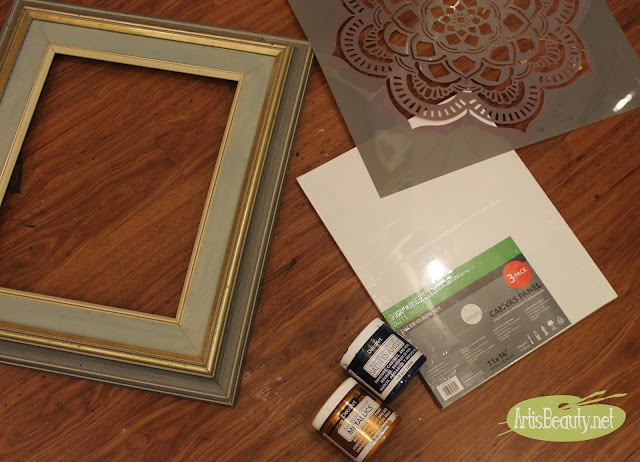
thrifted frame deco art mandala stencil metallics and satin enamels paint boho chic eclectic decor
To start you will just need a few basic items.
You don't need to use the same colors I used and you can "FREE STYLE" all you like.
This is just a guideline.
For my bathroom I chose Deco Arts Satin Enamel in Denim
and Deco Arts Metallics in Gold.
I have had this thrifted frame sitting in my stash for years.
I also had my 16x20 canvas panels in my stash.
The PERFECT fit for my frame. Can you say CONVENIENT?
I wanted something fun and eclectic so I chose to use my 

boho chic decor diy easy mandala artwork canvas paint stencil


Now to cover your canvas you could really use any brush you wanted.
Since I was rushing and I wanted large texture for my background I actually just used my 
It's the same brush I use for furniture.
I simply dabbed my brush with some of my blue paint and made LARGE swirling brush strokes over the whole canvas.
I wanted it to have depth so I didn't fully cover my canvas. I wanted some of the white poking through behind giving it texture.


deco art easy diy stenciled chic boho style mandala canvas artwork


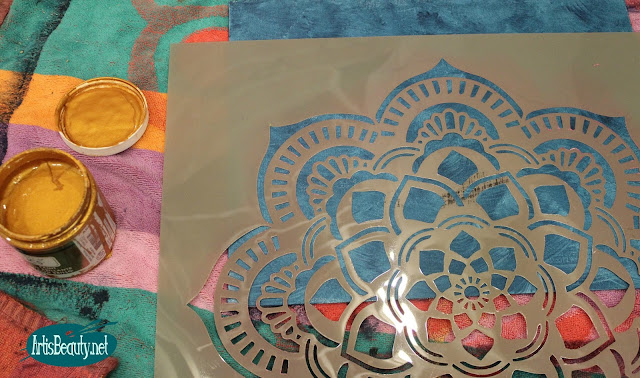
Once the canvas was dry I grabbed my Stencil
and decided where I wanted it.
I knew I wanted to cover almost 3/4s of my canvas so thats where I laid it.
Then I grabbed my metallic paint and a stencil brush
and brushed on my pattern.

This is what I had after the gold. Notice all the texture now that its dry.


Now to make the frame feel a little more FRESH and FUN
I just used the same blue paint and filled in the canvas part of the frame.
It went on darker because of the different material and I LOVED the richness it added.
Once everything was dry I popped it in the frame and it was ready for its close up.
easy diy mandala artwork boho chic painting canvas bohemian eclectic decor

I love having something fun and eclectic in the bathroom.
I also like having something that is one of kind.
easy diy mandala artwork boho chic painting canvas bohemian eclectic decor
See, I told you it was EASY!
I can't wait to see what you guys make!
Until next time,

Have a BEAUTIFUL day!

Monday, November 7, 2016

DIY Vintage Driftwood Shiplap Copper Christmas Signs.


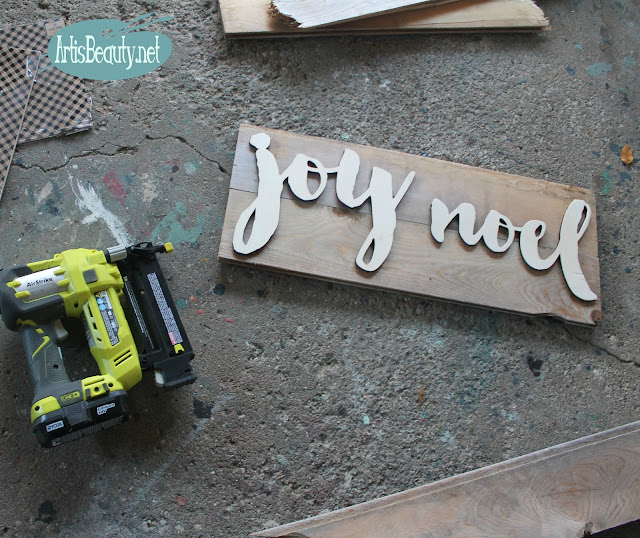
wood joy and noel cut out words diy craft target

Welcome back my Beauties!
Its beginning to feel a lot like CHRISTMAS!!
Just kidding...its not..
and most likely this will be the ONLY Christmas decor post I do.
Plus I usually don't do them before Thanksgiving just on a personal principle but I will be gone for 2 weeks in Florida
closing down my moms house there, so we can sell it now that she is gone.
I figure I am not going to feel Real Christmasy when I get back 
from there and I will be getting home only a few days before Thanksgiving.
Being gone that long will also mean that I have to play MASSIVE catch up back home once I get back.
So that means I will be in Furniture painting BEAST MODE for the store. 
So there is you reasoning for my EARLY Christmas post.
(also if you could say a little prayer or send some good vibes my way, I am VERY VERY nervous and sad about closing down my moms house. If you have been following me all these years you know how many memories we have with my momma down there.
This will be the very first time I step on her porch and not have her there to hug me. It will also be the last time we see the place as it will be up for sale and will all take place while we are back home.)

Now that I got that off my brain, lets move on to the project. 
joy noel vintage driftwood shiplap diy craft christmas sign
You can see me here measuring how much room I would need for each word before I cut the boards. I used my AIRSTRIKE to nail the two ship lap pieces together.
Way back this summer, we were at our friends property on Lake Michigan. As is our usual we walk the beach looking for driftwood.
The kids run ahead and see if they can find any good pieces for MOM.  Well this year we found a bunch of sea grass rolled up in balls on the shore and in between them washed up were a bunch of broken pieces of vintage shiplap! Somehow they had floated ashore on the beach and I was glad to do a little beach cleanup and take the driftwood shiplap home with me.
When the kids asked me what I was going to do with it,
I casually said..."Oh, I will probably end up using them for Christmas signs" .

makita mitre saw vintage driftwood shiplap diy christmas signs joy noel coppe

Fast forward 4 months later and I am shopping at Target in the dollar spot and they have these cute little cut out wood "JOY" and "NOEL" signs for just a few bucks. 
My brain went into create mode and said.."SHIPLAP"
I got home grabbed my shiplap and got out my Mitre Saw
and cut them into the size I needed to fit the words.
devine color valspar radiant metals copper spray paint christmas signs joy noel vintage shiplad driftwood craft diy
Then I grabbed my copper spray paint and sprayed both of the words with it.
While those were drying I dry brushed my driftwood pieces so that the copper wording would pop.

ryobi airstrike brad nailer valspar spray paint diy christmas shiplap signs copper craft

Once everything was dry I used my Ryobi Airstrike nailer to attach them to the driftwood.
vintage driftwood shiplap copper joy christmas sign diy karin chudy artisbeauty craft airstrike
I love how the copper is so warm against the worn whitewashed ship lap.

Driftwood shiplap vintage copper noel christmas sign glitter sparkle home decor diy crafts
I had made these to sell, but I am kinda in LOVE with them,
and I am thinking I either need to make a few more or just keep it. 

noel and joy vintage driftwood shiplap christmas signs diy artisbeauty copper spray paint makeover airstrike nailer
 Here they are sitting on my mantle. 
Which honestly might be as decorated as it gets this Christmas.

driftwood vintage shiplap copper christmas joy noel signs handmade artsibeauty karin chudy spray paint dry brush
I hope you enjoyed this fun little Christmas Craft.
Hopefully, things go well in Florida.

Until next time, 
Go make someones day BEAUTIFUL.

Thursday, June 30, 2016

"HAPPY CAMPER" vintage window Summer Decor Vinyl Sign


This post uses affiliate links to help you find the products I trust and love


We are leaving for vacation so I thought I would hit REPLAY on one of my favorite summer craft projects from last year! ENJOY!

Good Monday Morning my BEAUTIES!!
We are in CRUNCH time here at the ART IS BEAUTY house...
(it seems we are always in CRUNCH time)
Never enough time and too much to do..
Hubby is re roofing the shed..(which I was was suppose to help with)
but then we both realized we leave for a family vacation in less than 10 days
and I had NOTHING for my booths.
I have been furiously working on furniture while he works on house projects..
OH and did I mention we are also suppose to paint our 2 story house within the next 10 days...
and yeah....I still haven't picked out a paint color yet..
Yeah..its how we ROLL....so while I was waiting for paint to dry
and working on other booth projects I thought...
"I will just quick sneak in a project for me"
Hah...no one would notice RIGHT????
Yeah he noticed....OH WELL..:)
If you remember I picked up a bunch of free windows over fathers day weekend.
I knew I wanted to make some projects with them and
just had to find the time to do them..
FUNNY....paint drying time is the PERFECT time..(especially when you don't feel like doing laundry)    :)

I cleaned up the windows and then had to decide what I wanted on them.
If you remember I made my Father in law a Wheel Cover for his camper
for Fathers day..
You can see that HERE.


I had liked the design so much and was trying to figure out how to incorporate it in the house.
The window was the perfect way.


I used my Silhouette to cut out my design with my vinyl 
and placed it onto my window.

I just love the VINTAGE feel that goes so well the window.
Normally Purple would not be a color I would choose,
but for some reason it just called to me.
I just loved it.
I hope you enjoyed this fun little project.
Be sure to come back tomorrow for the LINK party,
where you can show off all the goodies you have been working on.
Until next time..
Go make someones day BEAUTIFUL.