Showing posts with label home decor. Show all posts

Monday, April 20, 2020

DIY MARUSHKA INSPIRED Mountain Wall Mural Quarantine Edition!


This post is a sponsored post or  uses affiliate links to help you find the products I trust and love.
“As an Amazon Associate I earn from qualifying purchases.” 


Blank wall turned into a Marushka inspired Mountain Scene DIY Mural
Welcome back my Beauties!
What a WILD ride this last few weeks has been!
I have to admit that at the beginning of the Covid 19
Stay at home orders, I had GRAND PLANS of creating all kinds of wonderful works and organizing and cleaning.......
Funny, right??? ... I am guessing if you all are like me, those plans were just that.....
PLANS!!
You see I am used to being around my Family; a lot!
My husband is home in the summer and so are my kids,
but its usually WARM out and we can do things OUTSIDE..
This was not the case. 
This was more like winter break.
Lots of eating..not knowing what day it is
and not getting out of our pajamas.
My husband luckily was a bit more motivated than me.
You see since he is a Teacher he normally paints in the summers......for OTHER people.
I usually paint our home.
Since he was home he decided to paint all the rooms in the home that I hadn't painted in 15 years.
I had picked up the paint before all this and since we had it he decided to paint our hallway stairway and upstairs hallway.
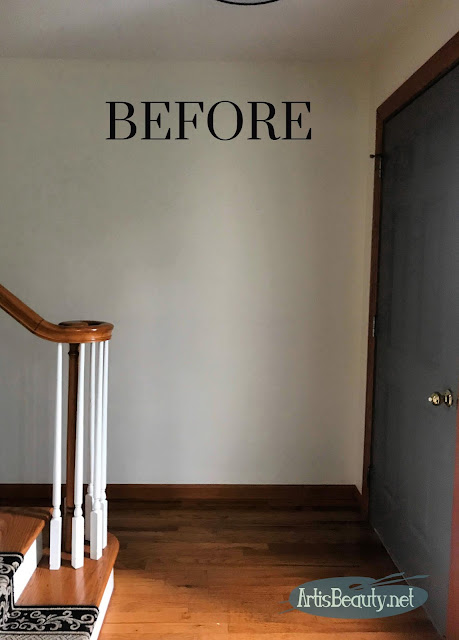
He finished all that and I was left with a blank wall.
I sit and see this wall every morning while I am in my chair and drink my coffee;  and
after 2 weeks of staring at the plain blank wall, my Artist brain FINALLY got motivated.

If you have been following me for any amount of time,
you know how much I love the mountains. We do big family mountain hiking trips every summer.
You can see a few of those posts.
https://www.artisbeauty.net/2017/06/tips-on-navigating-glacier-national-park.html
or HERE
https://www.artisbeauty.net/2018/10/tips-for-hiking-arches-national-park.html
Missing those mountains finally gave me the motivation I needed to create something that would really be a time capsule dedicated to this crazy time.
Using a table top to draw a circle and hand drawing the mountain scene for the wall mural artisbeauty.net karin chudy diy

Being a child born in the 70s
I have had some strong influences.
One of them a local artist who created 
what we from Michigan lovingly refer to as
It was a style of silk screen graphic prints by a local teacher/artist named Richard Sweet
that were pretty much on everyone's wall growing up. 
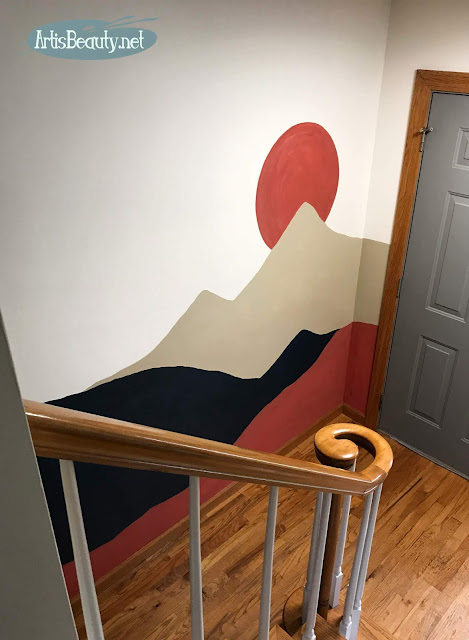
I decided the wall mural I painted was going to be along those lines.
Simple but BOLD.
I needed a perfect circle to start and after trying to figure out how to maybe do it with a compass and a string and a pencil I looked into my kitchen and saw my little bistro table.

hand drawing the mountain scene for the wall mural artisbeauty.net karin chudy diy
My husband kindly unscrewed the top so I could use it to draw my most perfect circle and focal point for the painting.
After I had that I could start hand drawing my mountains. 
I took a pencil to the freshly painted walls and sketched out my design.
Use what you have to create a mountain wall mural indoors during quarantine karin chudy artisbeauty.net
Since I couldn't run out and get whatever supplies I needed I decided to go through all of my paints in the house and use those old color theory lessons and mix up the custom colors I wanted. 
mountain wall mural diy do it yourself use what you have before and after outdoors inside
Then I could finally get to work.
Funny how once I finally drew on the wall the painting was not scary.
(I know it was weird that drawing on the wall scared me more than putting permanent paint down)
Painting the sun/moon on a Use what you have to create a mountain wall mural indoors during quarantine karin chudy artisbeauty.net
I got to work painting, sometimes mixing the color right on the wall until I got the right tone I wanted.
Once I had it the color I wanted I filled it all in and gave it 2 coats and some touch ups.
I left some dry brushing on the sun/moon to give it depth and texture.
It was nice to have a distraction from the outside world
while I spent 2 days working on this mural.
walking down the stairs looking at the Marushka inspired Use what you have to create a mountain wall mural indoors during quarantine karin chudy artisbeauty.net
One of my favorite things now is being greeted by my Mural as I walk down the stairs in the morning.
Easy DIY MOUNTAIN WALL MURAL QUARANTINE EDITION. USE WHAT YOU HAVE MARUSHKA INSPIRED DO IT YOURSELF KARIN CHUDY ARTISBEAUTY.NET

It brings a smile to my face as I start my day.
Blank wall turned into a Marushka inspired Mountain Scene Use what you have in your home DIY accent wall mural Karin Chudy artisbeauty.net

Plus this is my view now when I sit and drink my coffee every morning! I get to see my mountains even when I am stuck inside.

I hope this has brought a little bit of happiness and fun to your day.

Easy DIY MOUNTAIN WALL MURAL QUARANTINE EDITION. USE WHAT YOU HAVE MARUSHKA INSPIRED DO IT YOURSELF KARIN CHUDY ARTISBEAUTY.NET

Honestly...this was the scariest part!
Having my picture taken.
At this point I hadn't put jeans on in 4 weeks...or makeup...
or done my hair.
I already don't like to be photographed as it is, but decided to be a little brave and get my picture taken...(Again as a time capsule sort of deal) 
I am glad I have this now since most likely its gonna be another 4 weeks before I do any of those things again :)

persian rug, vintage, diy, stair runner replacement using throw rugs, ryobi, before and after.

(UPDATE....I changed my stair runner using throw rugs to go along with the new MURAL... You can see that post HERE

Easy DIY MOUNTAIN WALL MURAL QUARANTINE EDITION. USE WHAT YOU HAVE MARUSHKA INSPIRED DO IT YOURSELF KARIN CHUDY ARTISBEAUTY.NET

I hope you are all hanging in there.
I hope you are all healthy and safe.
Make your day Beautiful and Kind! 
Until next time! 

Friday, August 11, 2017

Custom Gray Antique Dresser Makeover and a few words about my Blogging Anniversary


industrial style beat up antique vintage dresser dark wood makeover paint boho style
Welcome back my Beauties.
I know my posts have been few and far between lately, but I just seem to be in that stage of life. 
I still don't seem to be able to get into a normal routine and I am starting to accept that I may never get back into my normal schedule; at least for a few years. 
I heard the best quote the other day (said in an IRISH ACCENT it makes it sound so much more profound) "when you don't have a time table you can't be late, when you don't have a destination you can't get lost." It struck such a chord with me at this stage in my life. 44 still grieving my mother, 7 year blogging anniversary that I didn't even remember. I decided I was PUSHING against life to much..and now I am going to let LIFE do a little more of work now. I am going to see where Life leads me. It pushed me to be an artist and pull out my oil paints again and a blogger out of my comfort zone and sell in a shop. I don't know why I stopped and started pushing back against it; but I am finally starting to feel a little more excited to where life is going to take me. 
repairing and refinishing and painting a beat up antique vintage dresser to and industrial beauty
One thing that hasn't changed is my love for doing makeovers.
Even if I got out of the habit of writing posts about them.
So today I will show you one of the pieces I recently sold 
that I had fixed up.
I grabbed this baby at the local thrift shop.
It called to me because of its odd shape.
I knew from the bottom that it had at some point been cut down.
The legs were kind of MISSING but it still looked cool.
The only issue was the TOP was a mess.
So that's where I started.
This post is a sponsored post or  uses affiliate links to help you find the products I trust and love
For the top I just used my Rockwell Orbital Sander to make short work of sanding the top
http://amzn.to/2vqbEtjsanded and refinished antique dresser top stain finish makeover
http://amzn.to/2vmFVLo

I sanded it down to take out all the gouges and "STUFF" off the top to reveal it's beautiful grain. Since I loved the grain as it was I didn't even stain it. I just used
custome general finishes paint color emerald driftwood and somerset gold diy painted dresser makeover
For the base I created a custom color using General Finishes Milk Paint
Driftwood Gray as the base with a touch of Emerald green and Sommerset Gold to warm up the gray and give it an earthy and more mineral color.

rock geode mineral style knobs hardware dresser pulls diy painted furniture makeover
ceramic stone finish knobs
The reason I wanted to do a more earthy gray was to match to my 
Ceramic Stone finish Knobs that I bought just for the piece.
geode mineral antique dresser makeover boho chic bohemian decor makeover

I love how the new hardware helped to transform the whole piece. 
It gave it a bit more of an industrial feel!
custom gray antique dresser makeover with geo knobs boho chic bohemain diy painted furniture
It got lots of compliments at the store and I know part of that was the simple paint with the fun earthy knobs.

before and after custom earthy gray grey painted dresser makeover boho bohemian industrial style
I hope you enjoyed this latest makeover,
and thanks for listening to me kind of spill my heart guts a little.
Now I am off to work on some more makeovers
and see what life has in store.
Until next time,
Have a BEAUTIFUL day.

Friday, May 26, 2017

Bohemian Style Painted Desk Makeover

DIY BLOGGER Old outdated vintage pine desk given a bohemian makeover via Paint stain and hardware
Hey!! Welcome back my Beauties!!
Can you believe it?
I finally had time to write up a new post!
This piece has been done for about a month but crazy kids school schedule has kept me runnin in about 10 different directions at once!
I am actually sitting at my twins orchestra concert waiting for it to start as I type this.
I picked up this desk for about $10at the local thrift shop.
It wasn't much to look at and you can see they tried to "improvise" the missing knobs with some rope.
But that didn't really work out so well.
beat up old vintage pine desk given bohemain makeover BEFORE diy blogger
The top had some sort of GUM residue or something FUN on top that wasn't fun to look at!

This post is a sponsored post or  uses affiliate links to help you find the products I trust and love

vintage beat up old desk gets boho style makeover sanding the top makeover rockwell orbital sander
Luckily it was nothing my 
couldn't take care of.
A couple of passes with that in different grit and the top was ready to be stained and sealed.

deco art american decor chalky finish paint in TREASURE green painted boho style desk makeover
While the top was drying I started working on the base.
Since I wanted to give it a punch of color to give it that BOHO feel I chose
A couple coats of that and it was looking better already!
DECO ART Americana Acrylic sealer Finisher over paint DIY bohemian Desk Makeover before and after
I used the 
to keep that chalky finish look to the piece.
Once it was all done I just grabbed some copper colored knobs to finish the piece off!

Treasure green deco art chalky finish Bohemian Boho Style Vintage Desk makeover painted before and after

I think you will agree, that it looks quite different than the before.
bohemian painted desk makeover diy deco art mint green chalky finish makeover

I will take that bright boho feel over that beat up orange finish any day!

before and after painted bohemian boho style desk makeover diy deco art americana treasure paint


I hope you think so too!
Until next time there is a break in the crazy kid schedule!
Have a BEAUTIFUL day!


Tuesday, May 23, 2017

Gray and Mint Ikat Stencilled Dresser Makeover


Hitting replay on this post from last year! 


Welcome back my Beauties!
I am so excited to be back with a new makeover.
Things have been pretty crazy here getting all the kids to 
all their school events and sports and getting ready 
for my OLDEST to graduate (how is this happening, I still feel like I just graduated :)) 
But during the day when I am not doing all that I have been 
making over furniture like crazy.
I finally got a few hours last night to put together this post.
So here it is!


This is what the dresser looked like before.
Just a plain old standard dresser.
This post is a sponsored post or  uses affiliate links to help you find the products I trust and love

 Luckily I had just got a bunch of goodies.
I had the Ikat Stencil and a bunch of Americana Decor Paints

I gave the dresser 2 coats of Americana's Relic Chalky Finish Paint

After the paint dried I used the IKAT stencil and the Americana color REFRESHING and stencilled on my pattern.

Once that was done I used the Americana Varnish to seal the piece.

And to give it that final POP, I added these JADEITE knobs.
They went perfectly with the paint and style of the piece. 

I just love how it all came together.
A totally different look than the original dresser.

I hope you enjoyed this latest makeover.
I can't wait to start getting back into 
a schedule again where I can start sharing on a more regular pattern.
Until next time,
Have a BEAUTIFUL day

Friday, March 24, 2017

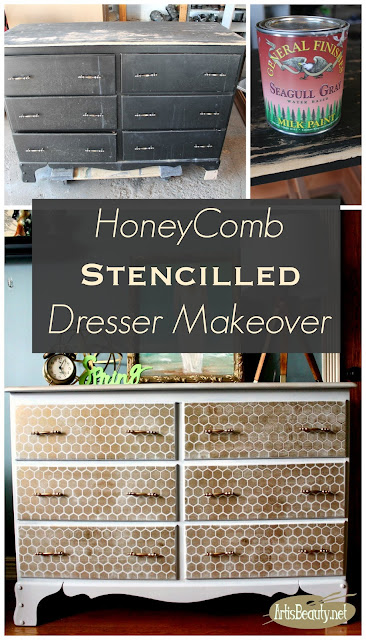
Gray and Gold Distressed HoneyComb Stencilled Dresser Makeover

beat up free dresser turned gray and gold honeycomb stencilled beauty bohochic home decor makeover before and after

Welcome back my BEAUTIES! 
Sorry I have been absent so far this week. 
Soccer season has started and that means lots of running around.
Not to mention the stress of try outs and waiting to see if my daughter would be making the team..
HAPPILY she made the Varsity team, and we basically started out of the GATE with double scrimmages on Saturdays and a game under our belt already! 
I'm not even playing and I am TIRED!!
:)
Anywhoo...what I did manage to work on was this awesome free dresser that a sweet friend of mine gave me.


http://www.artisbeauty.net/2017/03/mid-century-mod-dresser-makeover-mcm.html
The same friend that gave me this Beautiful Mid Century Mod dresser  that I made over!
They have been going through a lot also so if you have any good thoughts you could send their way I know they would appreciate it!
My friend is pretty awesome as well as her whole family, and when they had some furniture to unload they knew who would take it off their hands! :)
I love furniture donations!!! :)


http://amzn.to/2ncNpee


This post is a sponsored post or  uses affiliate links to help you find the products I trust and love
To get the piece started I gave it a good sanding and wipe down and then chose 
to cover the whole piece with.

general finishes seagull gray water based milk paint dresser makeover before and after
It was looking better already.
Now you know I can't leave a plain ole boxy dresser alone.
I wasn't sure what I wanted to do and then I remembered I had this awesome stencil!
http://amzn.to/2nJc3pq
I grabbed some gold paint and my brush and got to work.


General finishes seagull gray americana decor honeywire stencil in gold dresser makeover before and after

The dresser had some imperfections in it so I didn't want my gold paint to look to perfect or even. I stencilled on all the drawer fronts and then lightly sanded over it to give it a bit of a distressed feel. 
Once it was dry I but the original hardware that I spray painted gold back onto the dresser.
gray and gold distressed honeycomb stencilled dresser painted makeover deco art americana diy

And this is how it turned out.
I love the gray and gold color combination.
Its feels a bit classy, a bit bohemian, and mostly, FUN!

honeycomb geometic gray and gold dresser makeover bohochic distressed stencil diy before and after
When I look at it now it makes me smile.
honeycomb stencilled dresser makeover general finishes seagull gray paint deco art stencil before and after
Well that's it for this makeover!
I hope you liked the transformation.
I am going to try to squeeze in one more makeover before next weekend since we will be leaving for a fun spring break as a family.
We are needing the down time of no schedules and no ALARM clocks for a week!
Until next time,
I hope you have a BEAUTIFUL day!