Showing posts with label hallway. Show all posts

Monday, April 20, 2020

DIY MARUSHKA INSPIRED Mountain Wall Mural Quarantine Edition!


This post is a sponsored post or  uses affiliate links to help you find the products I trust and love.
“As an Amazon Associate I earn from qualifying purchases.” 


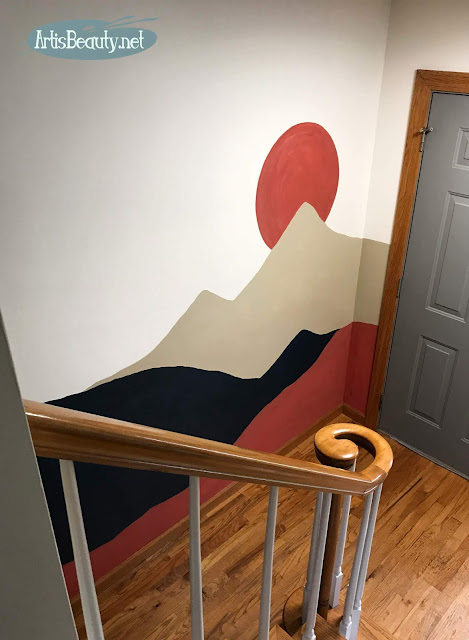
Blank wall turned into a Marushka inspired Mountain Scene DIY Mural
Welcome back my Beauties!
What a WILD ride this last few weeks has been!
I have to admit that at the beginning of the Covid 19
Stay at home orders, I had GRAND PLANS of creating all kinds of wonderful works and organizing and cleaning.......
Funny, right??? ... I am guessing if you all are like me, those plans were just that.....
PLANS!!
You see I am used to being around my Family; a lot!
My husband is home in the summer and so are my kids,
but its usually WARM out and we can do things OUTSIDE..
This was not the case. 
This was more like winter break.
Lots of eating..not knowing what day it is
and not getting out of our pajamas.
My husband luckily was a bit more motivated than me.
You see since he is a Teacher he normally paints in the summers......for OTHER people.
I usually paint our home.
Since he was home he decided to paint all the rooms in the home that I hadn't painted in 15 years.
I had picked up the paint before all this and since we had it he decided to paint our hallway stairway and upstairs hallway.
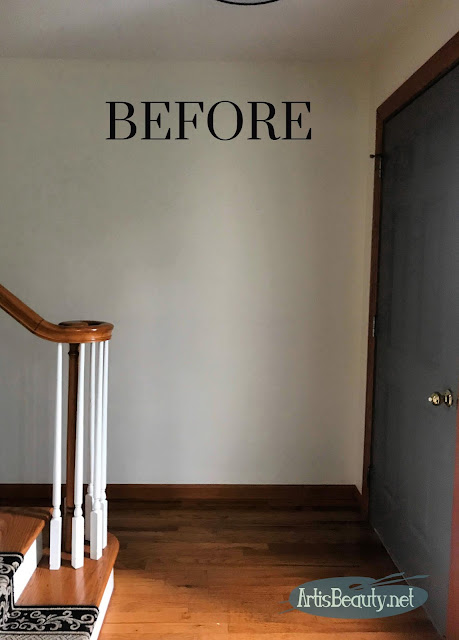
He finished all that and I was left with a blank wall.
I sit and see this wall every morning while I am in my chair and drink my coffee;  and
after 2 weeks of staring at the plain blank wall, my Artist brain FINALLY got motivated.

If you have been following me for any amount of time,
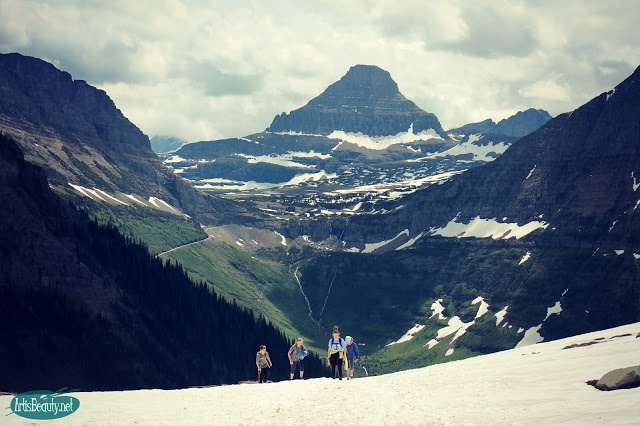
you know how much I love the mountains. We do big family mountain hiking trips every summer.
You can see a few of those posts.
https://www.artisbeauty.net/2017/06/tips-on-navigating-glacier-national-park.html
or HERE
https://www.artisbeauty.net/2018/10/tips-for-hiking-arches-national-park.html
Missing those mountains finally gave me the motivation I needed to create something that would really be a time capsule dedicated to this crazy time.
Using a table top to draw a circle and hand drawing the mountain scene for the wall mural artisbeauty.net karin chudy diy

Being a child born in the 70s
I have had some strong influences.
One of them a local artist who created 
what we from Michigan lovingly refer to as
It was a style of silk screen graphic prints by a local teacher/artist named Richard Sweet
that were pretty much on everyone's wall growing up. 
I decided the wall mural I painted was going to be along those lines.
Simple but BOLD.
I needed a perfect circle to start and after trying to figure out how to maybe do it with a compass and a string and a pencil I looked into my kitchen and saw my little bistro table.

hand drawing the mountain scene for the wall mural artisbeauty.net karin chudy diy
My husband kindly unscrewed the top so I could use it to draw my most perfect circle and focal point for the painting.
After I had that I could start hand drawing my mountains. 
I took a pencil to the freshly painted walls and sketched out my design.
Use what you have to create a mountain wall mural indoors during quarantine karin chudy artisbeauty.net
Since I couldn't run out and get whatever supplies I needed I decided to go through all of my paints in the house and use those old color theory lessons and mix up the custom colors I wanted. 
mountain wall mural diy do it yourself use what you have before and after outdoors inside
Then I could finally get to work.
Funny how once I finally drew on the wall the painting was not scary.
(I know it was weird that drawing on the wall scared me more than putting permanent paint down)
Painting the sun/moon on a Use what you have to create a mountain wall mural indoors during quarantine karin chudy artisbeauty.net
I got to work painting, sometimes mixing the color right on the wall until I got the right tone I wanted.
Once I had it the color I wanted I filled it all in and gave it 2 coats and some touch ups.
I left some dry brushing on the sun/moon to give it depth and texture.
It was nice to have a distraction from the outside world
while I spent 2 days working on this mural.
walking down the stairs looking at the Marushka inspired Use what you have to create a mountain wall mural indoors during quarantine karin chudy artisbeauty.net
One of my favorite things now is being greeted by my Mural as I walk down the stairs in the morning.
Easy DIY MOUNTAIN WALL MURAL QUARANTINE EDITION. USE WHAT YOU HAVE MARUSHKA INSPIRED DO IT YOURSELF KARIN CHUDY ARTISBEAUTY.NET

It brings a smile to my face as I start my day.
Blank wall turned into a Marushka inspired Mountain Scene Use what you have in your home DIY accent wall mural Karin Chudy artisbeauty.net

Plus this is my view now when I sit and drink my coffee every morning! I get to see my mountains even when I am stuck inside.

I hope this has brought a little bit of happiness and fun to your day.

Easy DIY MOUNTAIN WALL MURAL QUARANTINE EDITION. USE WHAT YOU HAVE MARUSHKA INSPIRED DO IT YOURSELF KARIN CHUDY ARTISBEAUTY.NET

Honestly...this was the scariest part!
Having my picture taken.
At this point I hadn't put jeans on in 4 weeks...or makeup...
or done my hair.
I already don't like to be photographed as it is, but decided to be a little brave and get my picture taken...(Again as a time capsule sort of deal) 
I am glad I have this now since most likely its gonna be another 4 weeks before I do any of those things again :)

persian rug, vintage, diy, stair runner replacement using throw rugs, ryobi, before and after.

(UPDATE....I changed my stair runner using throw rugs to go along with the new MURAL... You can see that post HERE

Easy DIY MOUNTAIN WALL MURAL QUARANTINE EDITION. USE WHAT YOU HAVE MARUSHKA INSPIRED DO IT YOURSELF KARIN CHUDY ARTISBEAUTY.NET

I hope you are all hanging in there.
I hope you are all healthy and safe.
Make your day Beautiful and Kind! 
Until next time! 

Wednesday, July 29, 2015

Before and After Laundry Room Floor Makeover "the RUNWAY"


Good Morning again my BEAUTIES!
I have a fun and pretty quick little makeover project to show you this morning.
We just redid our laundry room/hallway floor that connects to the little powder room 
I did this winter.

You can see the Powder room makeover HERE
Well I know you think that BLOGGERS LOVE to do huge intricate difficult crazy high end
projects..BUT, man oh man...sometimes..you just got to go with Sticky Tiles..:)
You heard me.
Our latest project used sticky tiles.
 You see this part of the floor is what we like to call....THE RUNWAY!
It connects the garage to the kitchen. In it is the Main Floor Laundry (which the people who built this house in the early 1960s even had the for thought to think of since they also had a large family)
and the half bath. It contains one coat closet and the cleaning supplies closet.
It is a very very busy area.
When we had originally discussed the bath makeover we were planning on continuing on the tile from the bath into the hallway.
For those of you have done tile work,
you know how long the process takes.
You have your subfloor you have to lay..then you have to cement your tiles in..
then you have to grout the tile..then seal the tile and wait 3 days for the sealer to cure.
How long do you think we could go without using this hallway???
Are you catching my drift.
My hubby decided while we were doing the bath..that Tiling the hallway 
WASN'T GONNA HAPPEN :)
Having a family of six..he knew that just one day missing laundry to move the machines out was going to create an enormous back up of laundry...plus getting our front loaders in and out into the garage was really not a fun thing he wanted to think about so we had to go back to the drawing board.
Now when we had first moved into our house almost 20 years ago we had changed this floor.
Even back then we had used a very good sticky tile.
So good in fact it did NOT want to come up.
While starting this project we had to keep a row of the OLD tiles down in the middle so we could keep using the runway until we were ready to start laying tiles.
Now if you follow me on PERISCOPE (its a new live broadcasting app)
You were able to watch as we started this project
You can find me on periscope by searching Art is Beauty
and you can see more live broadcasts.
Once all the old tiles were up we were able to start laying the new tiles.
I should mention before we started we popped off all the shoe molding so that when we were done we could pop it back on and give a cleaner look to the tile.
We found the center of our floor and stared laying the tiles out from there.
Now we still had to move the washer and dryer, but instead of moving them all the way out of the house what we did was once the floor was mostly done in front of the machines we
covered the floor to protect it and just popped the machines forward..
we found SO MANY TREASURES behind them. :)
Things I had been going crazy looking for had mysteriously ended up behind the washing machine!
 This also gave us a great excuse to clean..:)
we cleaned out the dryer vent tube and all the other good stuff that likes to go behind appliances and got to work on the floor behind there.
Its so fun working in confined spaces...
:)
finishing behind the dryer and getting ready to put the shoe molding back on.
Once behind the washer and dryer was done and the molding back on we could push them back,
finish the couple compound cuts that had to be made along the wall and we would have our runway back in RUNNING order.

Here is looking down the runway to the garage door.

and here is the view looking towards the kitchen and POWDER ROOM
I love how it turned out.
We just used a very thick high grade sticky tile from one of our local home stores.
It has the grout line built in but you can also choose to grout on top of that too.
We are sticking with this for now, but maybe in the future we will grout it.:)
 I am so happy with the difference and the fact that it really only took one full day to complete.
The only tools we needed were a very sharp utility knife, some scissors and a straight edge.
I hope you enjoyed this fun makeover and that you are having a fabulous summer.
Until next time,
Go make someones day Beautiful!