Showing posts with label tile. Show all posts

Thursday, April 20, 2023

Links to my projects on Instagram reels


Listen. I know it has been a while since I have posted here!


I have been going back and forth between "do I just let this part go"
or "do I try to incorporate the transition of REELS into my blog"
I have decided to ATTEMPT to Incorporate.
I don't know how well this will work.
Or if it will be a fruitless effort; but I figured I have been doing this for this long.
I might as well try.
:)
So I will periodically add any of my DIY reels into the blog where you can click on the pic with the attached link and see all the transformations.
I will eventually try to add product information to each of the pictures here but we will see if anyone has any interest in the old style anymore first.
As always, Thank you to all my BEAUTIES for always hanging around and encouraging me.
As usual I am a late bloomer with all this stuff; and that is OK. 

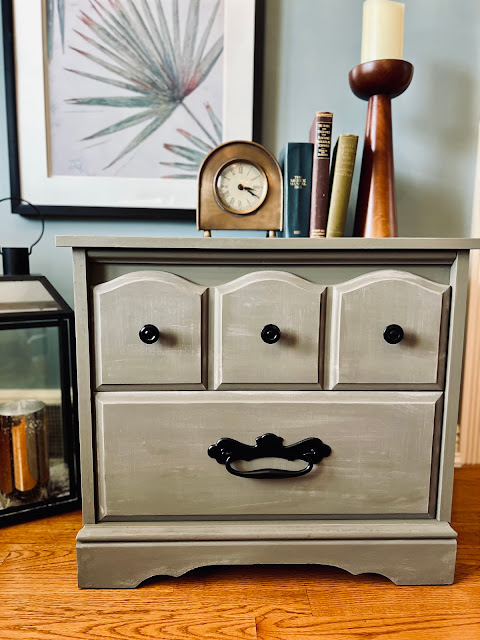
small nightstand painted makeover

Products used for makeover
Affil link.......


small toile painted vintage sewing cabinet makeover


LINK TO PAINT USED ON SMALL CABINET.
AFFIL LINKS BELOW
if you click the link it will take you to full video.
Product links below.
Outdoor patio awning roof makeover diy using plastic roofing and reed fencing.
Diy awning roof makeover. Outdoor entertaining pergola waterproof


Links to products used via Affiliate ad
Roof Panels 12 ft in smoke gray


Old Bamboo Cabinet Turned Vintage Glam Bar


Vintage China cabinet given makeover using removable wallpaper


You can see some of the products used in the room 

Daughter and Son in laws Colorado 
Bathroom floor makeover.


Items used for the floor makeover below


CLICK BELOW TO SEE THE WHOLE VIDEO
BEFORE AND AFTER
Upcycled old deck boards used to build free leopold bench

HERE IS THE LIST OF PRODUCTS YOU CAN CLICK ON TO SEE WHAT I USED


MCM mid century modern makeover using silk mineral paint
CLICK ON List of Products used

dogwood hand painted dresser artwork artist makeover before and after

LINK TO PRODUCTS BELOW 

Old beat up dresser turned Honeycomb dresser beauty .

You can find the products used HERE and HERE
old gray dresser distressed painted repainted and given a honeycomb stencil


You can find the paint used HERE
antique beat up old small 3 drawer dresser before and after


You can find the products used HERE and HERE and HERE
(we used the 6 year semi transparent in OCTOBER BROWN)

24 year old deck given a power wash and refesh with valspar stain


small nightstand makeover using SIlk Mineral paint

Small nightstand makeover before and after using silk mineral paint


Budget Bathroom update using removable wallpaper and paint
Budget bathroom makeover using removable wallpaper and paint.
REEL POST HERE! 


Free roadside dresser makeover

ROADSIDE RESCUE DRESSER MAKEOVER 
USING PAINT AND NEW HARDWARE.

Beat up old desk given French blue makeover

BEAT UP OLD DESK GIVEN A FRENCH BLUE MAKEOVER USING 
PAINT AND A FURNITURE TRANSFER.
YOU CAN FIND THE TRANSFERS HERE 
Removable wallpaper for laundry room
Quick laundry room update using Removable wallpaper
Link to Wallpaper is HERE 
REEL POST HERE


Wednesday, July 29, 2015

Before and After Laundry Room Floor Makeover "the RUNWAY"


Good Morning again my BEAUTIES!
I have a fun and pretty quick little makeover project to show you this morning.
We just redid our laundry room/hallway floor that connects to the little powder room 
I did this winter.

You can see the Powder room makeover HERE
Well I know you think that BLOGGERS LOVE to do huge intricate difficult crazy high end
projects..BUT, man oh man...sometimes..you just got to go with Sticky Tiles..:)
You heard me.
Our latest project used sticky tiles.
 You see this part of the floor is what we like to call....THE RUNWAY!
It connects the garage to the kitchen. In it is the Main Floor Laundry (which the people who built this house in the early 1960s even had the for thought to think of since they also had a large family)
and the half bath. It contains one coat closet and the cleaning supplies closet.
It is a very very busy area.
When we had originally discussed the bath makeover we were planning on continuing on the tile from the bath into the hallway.
For those of you have done tile work,
you know how long the process takes.
You have your subfloor you have to lay..then you have to cement your tiles in..
then you have to grout the tile..then seal the tile and wait 3 days for the sealer to cure.
How long do you think we could go without using this hallway???
Are you catching my drift.
My hubby decided while we were doing the bath..that Tiling the hallway 
WASN'T GONNA HAPPEN :)
Having a family of six..he knew that just one day missing laundry to move the machines out was going to create an enormous back up of laundry...plus getting our front loaders in and out into the garage was really not a fun thing he wanted to think about so we had to go back to the drawing board.
Now when we had first moved into our house almost 20 years ago we had changed this floor.
Even back then we had used a very good sticky tile.
So good in fact it did NOT want to come up.
While starting this project we had to keep a row of the OLD tiles down in the middle so we could keep using the runway until we were ready to start laying tiles.
Now if you follow me on PERISCOPE (its a new live broadcasting app)
You were able to watch as we started this project
You can find me on periscope by searching Art is Beauty
and you can see more live broadcasts.
Once all the old tiles were up we were able to start laying the new tiles.
I should mention before we started we popped off all the shoe molding so that when we were done we could pop it back on and give a cleaner look to the tile.
We found the center of our floor and stared laying the tiles out from there.
Now we still had to move the washer and dryer, but instead of moving them all the way out of the house what we did was once the floor was mostly done in front of the machines we
covered the floor to protect it and just popped the machines forward..
we found SO MANY TREASURES behind them. :)
Things I had been going crazy looking for had mysteriously ended up behind the washing machine!
 This also gave us a great excuse to clean..:)
we cleaned out the dryer vent tube and all the other good stuff that likes to go behind appliances and got to work on the floor behind there.
Its so fun working in confined spaces...
:)
finishing behind the dryer and getting ready to put the shoe molding back on.
Once behind the washer and dryer was done and the molding back on we could push them back,
finish the couple compound cuts that had to be made along the wall and we would have our runway back in RUNNING order.

Here is looking down the runway to the garage door.

and here is the view looking towards the kitchen and POWDER ROOM
I love how it turned out.
We just used a very thick high grade sticky tile from one of our local home stores.
It has the grout line built in but you can also choose to grout on top of that too.
We are sticking with this for now, but maybe in the future we will grout it.:)
 I am so happy with the difference and the fact that it really only took one full day to complete.
The only tools we needed were a very sharp utility knife, some scissors and a straight edge.
I hope you enjoyed this fun makeover and that you are having a fabulous summer.
Until next time,
Go make someones day Beautiful!

Wednesday, May 27, 2015

Quick Kitchen Backsplash Makeover using Smart Tiles.


Good Morning my Beauties!
I have a fun but NOT SO PERFECT post for you today.
Now its not the project that isn't perfect;
its my photos.
When I started this project I didn't know I was going to post about it,
but I was so excited I figured you guys could handle my iphone photos 
just to see the transformation.

As I have been showing in my Facebook page which you can Follow HERE,
you may or may not know I have been working on Making over 
my sisters condo.
This is what we started with.
Some very out of date wallpaper.
Not my sisters style at all.
We stripped all the wallpaper and she got to painting thew walls.
Once the paper was stripped we were trying to decide what we were going to do for the back splash.

In a moment of Serendipity we both at different times stumbled upon
this product called SMART TILES.
I had never seen or heard of them and neither had my sister until 
we started looking for an easy back splash solution.

I sanded and cleaned the back splash and got to work.
One of the great part of these tiles is they fit together much like a puzzle
and you only need a utility knife to cut them.


Now I told you the pictures are not the best (my niece shot this one with her iphone while I was installing)
The whole back splash took me just under 2 hours.
You can see here how I quickly made my way across the back of the wall.

and here is the finished product.
My sister and brother in law love it and
we got many compliments through out the day of mad people who had spent WAY to much on real tile when they could have had the look of tile without the Cost.
The great thing for you guys is I will be able to show you a better DIY of this product.
I loved it so much I am going to use it myself.
So stay tuned for another, better quality picture and detailed write up 
of this product.
I am so excited to start.
I hope you enjoyed this latest makeover.
Even if the pictures are kind of cruddy, I hope you can see what a change this made.
Until next time, go make someones day Beautiful!

Monday, January 26, 2015

Tiny Half Bath Makeover Part 1


This post is a sponsored post or  uses affiliate links to help you find the products I trust and love
Its Makeover Monday again here at Art is Beauty.
We have been working on a TINY room that has been a HUGE
Project for a couple weeks now.
We are redoing our tiny half bath off our garage/laundry room area.
My hubby bought me a vanity for Mothers day almost a year ago.
Its been patiently waiting for us in the garage while we pulled together all the parts of the makeover.
When I had finally decided on my final plan for the room,
It was time to get started.
The first part was tearing up Not one...but 3 layers of subfloor.
You can see in the above pictures just a few of the layers.
We live in an older house and the previous owners instead of removing each layer of flooring
chose to just lay subfloor over subfloor.
So first things first...removing the layers,
Taking out the toilet as late as possible measure...
with 6 people in the family...
EVERY TOILET MATTERS.

Once we got through almost all the layers of flooring it was time to take 
off the toilet and the sink.
You can see here we removed the toilet and stuffed a rag in
it to prevent nasty gasses from coming out.
Once we removed the sink we could finally rip out the last layer of flooring.
We also had to replace the plumbing..
there was copper into steel pipe and fittings and then pvc.
The Steel pipes were rotted out so it appears we had got to them just in time.
With all the flooring up after removing the sink and toilet we could
finally start moving forward.
Putting down the cement backer board.
Always remember to use galvanized screws since you don't want to have
to deal with any water or moisture rusting the screws.


Once that was set I could get moving on the paint.
I gave the ceiling a fresh coat of white and
the walls a custom color that we had mixed up years ago and used in our den.
Its one of the only rooms that I have never wanted to repaint.
I loved the color so much I was happy to have another room to put it in.
THIS...thing is the BOMB!!
This is not a sponsored post..so anything you see me naming is purely out of love.
I have used this since we bought our first house.
I really don't have the patience for taping and this as long as you make sure you
keep the little roller cleans makes edging go so fast that I have yet to 
find anything else that can help me this much in painting.
Its a Shur-line edger.

Now that the paint was up we could start on the BIG stuff.
LIGHTING...I bought this cute little rustic industrial light at the local Home Improvement store.
I love the look with the wall color.

After all that..It was finally time...
Time to tile.
I searched and searched for tiles and my heart kept coming back to these vintage
styled honeycomb tiles.
Classic black and white pattern that is timeless.
Hubby used my vintage scale to mix up the mortar
and he started setting the tile.
Honestly I could have done it myself
and there may have been less swearing if I had..:)
but the hubby has done it multiple times and figured it would just go faster if he did it.
He troweled out his grout and worked quickly to lay out the mesh backed tile.
The nice thing with this type of flooring is that there were only two small tiles that actually had to be cut with tile snips because most times you could just pop of a tile where it intruded.
And this is where I leave you for today.
The tile is down..
the spacers are out..and
Even as I type this..
I have already grouted..
But I will save that for the 2nd part of the makeover
and the reveal.

I hope you enjoyed this as much as I have.
I am getting very excited to move along and
also GET OUR TOILET BACK.
After 2 weeks we all still keep walking in to the bathroom
and saying "DANGIT" because as creatures of habit..
we keep forgetting.
Until next time.
Go make someones day BEAUTIFUL.