Showing posts with label diy repurpose. Show all posts

Friday, June 9, 2017

How I built a Vintage Rustic Farmhouse table for FREE!


vintage rustic build it yourself farmhouse fixer upper kitchen table for free from old bed and scrap lumber
Welcome back my Beauties!
I am trying to play catch up with all my posts that I did over the last summer while
I was helping take care of my mom before she passed.
One of those posts is my sons room makeover which I still haven't gotten to.
In that room was his old loft bed.
Knowing me and how I don't like to throw things away I decided to use what ever left over 
wood we could from his bed to make some stuff.


This post uses affiliate links to help you find the products I trust and love


http://www.artisbeauty.net/2016/08/old-kids-loft-bed-turned-rustic-vintage.html


 But I had some extra old picnic table boards laying on my side yard that kind of matched the Farmhouse table I built for our kitchen.

http://www.artisbeauty.net/2013/09/how-to-build-your-own-farmhouse-table.html

Only THIS time instead of spending $100, I spent $0.
That is my kind of deal!


First off...just like the other builds, I used all boards from the old bed to make my apron frame and my supports.
(you can even see one of the curved boards from the foot board in there)
I don't like to WASTE anything :)
Just like the other tables I made sure it was square and from underneath I screwed my table top boards to the frame from the supports.
I added my legs in the corner which were left over from another build and got to making her pretty.  
Remember you can see the original build plan with more detail HERE.

rockwell random orbital sander diy build it yourself farmhouse kitchen table from upcycled recycled lumber and old bed
Now it was time for my FAVORITE part;
making her PRETTY!
I grabbed my Rockwell sander and started taking down the old worn out picnic table type finish.


I have been dying to try Deco Arts Americana Self Sealing stain and I have to tell you, it's
AWESOME!!!!!
table top farmhouse stained in deco art americana color stain in charcoal furniture refinishing rescued lumber makeove
I have used a lot of 2 in one products but none that worked into the finish like this! 
After only one coat it had an almost hand rubbed finish. 
I am thinking of stripping down my own farmhouse table and doing this to it, I loved it so much!
Plus since it was self sealing I didn't have to worry about a protective top coat.
While that was drying I painted the apron skirt and legs in Americana Decor Everlasting
build a farmhouse table for free with scrap lumber diy build stain sanding


I just loved how it turned out and was happy that I was able to make another 
farmhouse style table from free lumber.
(I know my husband hates my COLLECTION of wood, but he didn't seem to mind when I brought it to the booth and sold it)
My "collection" paid off!


I would love to see if you build your own table.
I get emails quite a bit from people showing off the tables they built themselves 
and it always brings a smile to my face.
vintage rustic farmhouse table from old loft bed build it yourself diy karin chudy recycled upcycled lumber fixer upper

Until next time,
Have a BEAUTIFUL day!

Thursday, August 11, 2016

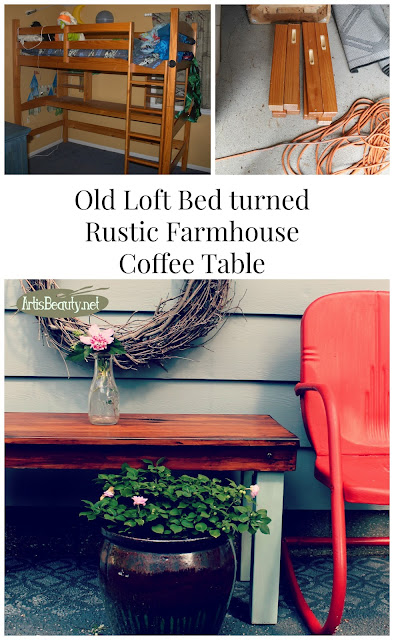
Old Kids Loft Bed TURNED Rustic Vintage Style Coffee Table


This post uses affiliate links to help you find the products I trust and love
Welcome back my BEAUTIES!! 
I am sorry that it has been so long since I have had a new post for you.
To say the last few months have been busy and stressful would be an understatement.
Now I normally live a very busy life anyway but the last few months we were on overload.
You see, in addition to our normal CHAOS my Sassy Pants Momma got very sick.
(if you follow me on Instagram or Facebook you know how much my Momma means to me and how Sassy she really is) :) 
We have basically been living at the Hospital or her home for around a Month give or take a few GOOD days when she was O.K. 
Even though I still was trying to cram in projects to fill my booth I had ZERO energy to Write, Edit or POST about them. 
I have always loved my Job because it allows me to always put my family first and this was a prime example of that time. 
I am happy to say that although she is not 100 percent back to her normal sassy spunky
self yet, she is starting to come around. 
So I am sorry that I have left you all for such a long period of time,
but I have my fingers and toes crossed and I am praying that my Momma gets better and I can get back to showing you my latest projects. (I have like 4000 in my photos) :)
So lets get started shall we. 
In the middle of all the Chaos with projects and my Mom, we were also right in the middle of finally making over my sons room. He is going to be 12 and his room had never been made over since it was his nursery.
This was the summer we transformed it.
(another project that is in my pile to show you)
One of the things we were changing was his bed.
Its an old Loft bed that I got thrifting a few years ago.


Well we started disassembling it and I had a brilliant idea!
We were going to be repurposing  part of the bed into a new bed for him so we couldn't really SELL the parts. 
You know how I HATE to throw anything of use out as well.
SO we started thinking...What could we do with all these left over PARTS??


 Then my husband said...TABLES!!!
The long shelf part was left from under the loft and the legs were cut off from part of the frame so my husband sketched up some plans close to what we did for our outdoor coffee table.
 You can see he built it close to the same style as our Outdoor DIY Custom Built Farmhouse Style Coffee Table

He build this and another end table and used the other parts to make an apron for a farmhouse dining table which I will also be showing you sometime down the line.
That table top was part of the shelf under the bed and the legs were part of the base of the bed with the apron being made with parts of the old guard rail.
Once it was together I took my Rockwell sander and sanded the top making sure I really sanded some spots so the stain would darken there and give it an aged feel.
Once it was sanded I used my General Finishes Java Gel to stain the top and then applied my General finishes High Performance sealer.
 For the legs I mixed up a custom mix mineral paint in a vintage mint color and slightly distressed them.
And this is what it turned out like.
I was such a rush to fill my booth that I never even got a chance to photograph the end table but I am sure you can picture a smaller more square version of this piece :)


Here is a shot where you can see the spots I sanded "EXTRA" and how it added to the rustic feel. 
Luckily I didn't have to beat up the top to much to make it feel vintage since my BOY did plenty of that with his legos and other toys. :)
So there  you have it...
Where I have been...and
What I have been doing..
Hoping and Praying that things calm down a bit
(who am I kidding..that never happens here :))
I hope to be back with you again soon with many many more projects and with reports of good health on my momma.
Until next time,
Go make someones day BEAUTIFUL! 


Thursday, June 30, 2016

"HAPPY CAMPER" vintage window Summer Decor Vinyl Sign


This post uses affiliate links to help you find the products I trust and love


We are leaving for vacation so I thought I would hit REPLAY on one of my favorite summer craft projects from last year! ENJOY!

Good Monday Morning my BEAUTIES!!
We are in CRUNCH time here at the ART IS BEAUTY house...
(it seems we are always in CRUNCH time)
Never enough time and too much to do..
Hubby is re roofing the shed..(which I was was suppose to help with)
but then we both realized we leave for a family vacation in less than 10 days
and I had NOTHING for my booths.
I have been furiously working on furniture while he works on house projects..
OH and did I mention we are also suppose to paint our 2 story house within the next 10 days...
and yeah....I still haven't picked out a paint color yet..
Yeah..its how we ROLL....so while I was waiting for paint to dry
and working on other booth projects I thought...
"I will just quick sneak in a project for me"
Hah...no one would notice RIGHT????
Yeah he noticed....OH WELL..:)
If you remember I picked up a bunch of free windows over fathers day weekend.
I knew I wanted to make some projects with them and
just had to find the time to do them..
FUNNY....paint drying time is the PERFECT time..(especially when you don't feel like doing laundry)    :)

I cleaned up the windows and then had to decide what I wanted on them.
If you remember I made my Father in law a Wheel Cover for his camper
for Fathers day..
You can see that HERE.


I had liked the design so much and was trying to figure out how to incorporate it in the house.
The window was the perfect way.


I used my Silhouette to cut out my design with my vinyl 
and placed it onto my window.

I just love the VINTAGE feel that goes so well the window.
Normally Purple would not be a color I would choose,
but for some reason it just called to me.
I just loved it.
I hope you enjoyed this fun little project.
Be sure to come back tomorrow for the LINK party,
where you can show off all the goodies you have been working on.
Until next time..
Go make someones day BEAUTIFUL.

Tuesday, March 29, 2016

Old Coffee Table turned Upholstered Bench


Running around like a chicken with its head off, so I am hitting replay on this old post!


Hello again my Beauties!
I have another fun makeover for you today.
I have had this coffee table sitting in my garage for 2 years...
Shhhh don't tell my hubby I admitted it.
He gets a bit perturbed when projects sit and I don't do anything to them for a while. 
This one had confounded me. You see, coffee tables are not HUGE sellers around here,
let alone, long 70s fake laminate top coffee tables.
Now I know I could have simply painted it and tried to sell it as a coffee table,
but I knew it had a better purpose.
I just had to figure out what it was.

Well;  INSPIRATION always seems to hit me when I have about 10 other projects going on
and this project was no different.
I was working on another (5) projects when I had a face palm moment.
(actually I was moving my craft stash and found my batting and thought DUH...
Lets make it a bench!
So I unscrewed the top of the table from the base and got to work.

Once I had the top off, I grabbed my fabric batting, cut it to size and started 
stapling it to the board.
Once I had my batting stapled with it curving around the edges to make it soft all the way around 
I got to upholstering my fun fabric that I had picked out.


For those that ask "HOW", I say its like wrapping a present.
I pull the one side and staple it down, making sure to keep it in line;
then do the opposite side pulling it taunt as I staple it.
Then you go to the others.
When you get to the corners you carefully fold it in being careful not to bunch
and lay it nice and flat then staple it. 
After I was done with that I went on to painting the base.
I chose a nice neutral gray to go with the fabric.
I think you will agree...
It looks much better as a Bench than it did as that dirty old coffee table.

I hope you enjoyed this latest makeover!
Until next time...
Go make someones day BEAUTIFUL.

Monday, March 14, 2016

Something to Talk About LINK Party and FEATURES!

Hi, sweet friends. We hate to say it, but the time has come to bid farewell…this will be our last Something To Talk About Link Party. We can’t tell you how much our team has appreciated you and your talents for the past 60 weeks! We have enjoyed getting to know you and can never thank you enough for you support of our link party. You can definitely continue to follow each of us at our prospective blogs to see what we are up to…and we will continue to follow you. We wish you all the best!
image-66
This week, CoCo from The Crowned Goat has chosen our top six features:
We would love to connect with you on social media!
Vicki and Jennifer from 2 Bees in a Pod || Facebook || Instagram |Pinterest || Twitter
CoCo from The Crowned Goat || Facebook || Instagram || Pinterest
Angie from Spain Hill Farm || Facebook || Instagram || Pinterest || Twitter
Karin from Art is Beauty || Facebook || Instagram || Pinterest || Twitter

Wednesday, February 24, 2016

French Easter Art using "Americana Decor CHALKY finish" paint


Hitting Replay today and showing you
how you can make some fun French Easter Art!

I got to try out the NEW AMERICANA Decor Chalky Finish paint and was
itching to try it out.
I was wracking my brain on what I wanted to use it on when I remembered a bunch 
of craft boards a friend had me rescue from her garage. 
Once I saw it the first thing I thought of was EGG...and with EGG I thought EASTER...
so I got to work.
I grabbed my Americana Decor paint and mixed up a little custom paint.
I wanted a slight pink..not to much..so I didn't mix all the way.
I wanted it to look blended on the board.. I used the colors Camel and Lace.
I loved that it was PINK but not TOO pink.

When the paint was dry I used Americanas French script stencil for my background.
I used my stencil brush and the LACE chalky finish paint to stencil on my script.
I was in love already and was loving how the paint was working all together.
This is where it gets even more fun. I used my Silhouette to
cut out a BUNNY shape (you could also use carbon paper and a bunny picture and simply
transfer on and paint a bunny) 
I used Americanas Chalky finish "NEW LIFE" to stencil on the bunny
and the french words "JOYEUSES PAQUES" which in french means
HAPPY EASTER. 
I thought it went perfect with the french script stencil.
to finish it off, I paired it with my little ceramic Bunny Family that my 
Momma passed on down to me...
I loved looking at them every Easter on the mantle (even thought the big one wearing the guitar was one I found thrifting so it matched my 4 kids) 
and now my kids get to grow up seeing it on my mantle....THAT IS...if they or I don't break it..
But I figure if it made it through me and my 14 siblings....
IT SHOULD in theory...make it here!
I hope you enjoyed the fun EASTER craft..(I can't believe for once I actually have a season up early)
and until next time...
Make someones day BEAUTIFUL!
Hugs,
Karin