Showing posts with label upholstery. Show all posts

Saturday, September 14, 2019

Restoring 2 Vintage Paul Mccobb Open Arm Chairs


This post is a sponsored post or  uses affiliate links to help you find the products I trust and love

1950s chairs, Calvin Furniture, chairs, dining chairs, excellent condition, four chairs, high quality upholstery, minor surface flaws, modern dining chairs, Paul McCobb, seating, set of dining chairs, solid walnut frames, sturdy chairs, United States
Welcome back my Beauties!
Bet you didn't expect to see me back so soon did ya?
Well, I have to say I have been on a roll working on some old pieces I have had in the garage and I figure I better not wait as long to post about them as I did to finish the pieces :) 
This is the story of more furniture that has been sitting in my garage for a few years.

1950s chairs, Calvin Furniture, chairs, dining chairs, excellent condition, four chairs, high quality upholstery, minor surface flaws, modern dining chairs, Paul McCobb, seating, set of dining chairs, solid walnut frames, sturdy chairs, United States

Last time I showed you this dresser that had been sitting in my garage for over 2 years. You can see that makeover HERE.

Well, those 2 chairs you see, they have been sitting just as long.

1950s chairs, Calvin Furniture, chairs, dining chairs, excellent condition, four chairs, high quality upholstery, minor surface flaws, modern dining chairs, Paul McCobb, seating, set of dining chairs, solid walnut frames, sturdy chairs, United States
I don't know what inspired me to get my rear in gear, but I think I honestly just got tired of looking at them.
Plus I was overwhelmed by the work both projects were gonna take.
I am not one to shy away from hard work, but I have to be in the right head space to do it.
So around the same time I started working on the dresser I decided to tackle the chairs.
I think part of the reason I was nervous was that they were very very cool chairs by a very famous designer Paul Mccobb.
Unfortunately, I found these chairs on the side of the road.
They had been left in the rain. 
I was so ticked because the finish I am sure would have been fine had they not been left in the rain. 
You can see what the rain had done to the finish in the above picture.

Ryobi battery powered cordless random orbital sander
So after 2 years of looking at them stacked in my garage I finally decided it was time.
I grabbed my Ryobi cordless sander and got to work.
1950s chairs, Calvin Furniture, chairs, dining chairs, excellent condition, four chairs, high quality upholstery, minor surface flaws, modern dining chairs, Paul McCobb, seating, set of dining chairs, solid walnut frames, sturdy chairs, United States

You can see here the sander made quick work, since the finish was almost non existent.

1950s chairs, Calvin Furniture, chairs, dining chairs, excellent condition, four chairs, high quality upholstery, minor surface flaws, modern dining chairs, Paul McCobb, seating, set of dining chairs, solid walnut frames, sturdy chairs, United States
Here is the part where I went a little crazy.
I know Paul Mccobb is suppose to be dark walnut stained and then finished, but I wasn't feeling it and since he liked to make modern things, I decided to modern them up too. :) 
I wanted their natural grain to show and only slightly darken it.
So I hand rubbed on a couple coats of Minwax Wipe on Poly
to just finish the natural beauty.

1950s chairs, Calvin Furniture, chairs, dining chairs, excellent condition, four chairs, high quality upholstery, minor surface flaws, modern dining chairs, Paul McCobb, seating, set of dining chairs, solid walnut frames, sturdy chairs, United States
For the seats I just used some black and white striped fabric that I had picked up at goodwill for an astoundingly cheap 3.99 a bolt.

1950s chairs, Calvin Furniture, chairs, dining chairs, excellent condition, four chairs, high quality upholstery, minor surface flaws, modern dining chairs, Paul McCobb, seating, set of dining chairs, solid walnut frames, sturdy chairs, United States
And there you have it.
Can you even believe the difference?
After all these years, I can't believe they are done.


1950s chairs, Calvin Furniture, chairs, dining chairs, excellent condition, four chairs, high quality upholstery, minor surface flaws, modern dining chairs, Paul McCobb, seating, set of dining chairs, solid walnut frames, sturdy chairs, United States

I love how the striped fabric works with the modern lines of the chair.


Now I have to hurry and take them to my booth before I decide to find a place in my house.
(believe me I have already walked around with them and tried to make them work :) )
1950s chairs, Calvin Furniture, chairs, dining chairs, excellent condition, four chairs, high quality upholstery, minor surface flaws, modern dining chairs, Paul McCobb, seating, set of dining chairs, solid walnut frames, sturdy chairs, United States


I hope you enjoyed this makeover!
I have another awesome piece that I saved from a friends garage 
that I am working on as I type.
Hopefully I am on a roll and will get that posted next week.
Fingers Crossed!
Until next time have a Beautiful Day! 

Thursday, June 23, 2016

$5 Coffee Table turned Nautical Bench.


This post uses affiliate links to help you find the products I trust and love
Welcome back my Beauties!
Its time for another makeover and this time its time for our 
THEMED FURNITURE MAKEOVER.


Once a month myself, and some of my blogging friends get together and do a Themed Makeover.
This months theme is COASTAL


I picked up this table at a garage sale a few weeks back and new instantly this would be my nautical project.
I knew I could easily turn it into a bench.
First thing was to remove the top. 
I love these kinds of coffee tables because they have these great little screws all along the top that make them easy to remove.
I just grabbed my cordless drill and removed it.
You can see here where I had done the same thing to a longer table.


Once I had my table top off I grabbed my roll of batting and cut it a little bit bigger than the size of the top making sure I would have enough to roll over the edges to round it out.
After that I used my staple gun to affix my yellow anchor fabric to the table top.

Once the top was done I decided to use some Chalky style gray paint for the base. My fabric has very light gray graphics on it and I thought this would be a good way to compliment it.

And here she is all finished.
Not bad for a $5 table.

A total transformation!


I hope you enjoyed this makeover and I would love for you to pop on over and see what all my other bloggy friends have been working on for their themed furniture makeover.
Until next time,
Have a Beautiful day!

Monday, April 25, 2016

Not so PERFECT Vintage Desk and Free Vanity Bench Makeover


Hitting REPLAY on an old post.
ENJOY!

Good Morning My Beauties! 
Last night I asked on FACEBOOK if you guys would like to see
NOT SO PERFECT posts.
You guys said yes...SO here is the first one.
Last night I explained that when I get super busy, I don't have time to 
set and photograph all the pieces.
Sometimes I have about 10 minutes before I have to bring some pieces in.
This set was one of them.

The desk started out like this.
Your typical wood and metal old school desk.


The bench started like this. 
My lovely sister gave it to me. 
Its an old vanity bench. it was in great condition but needed an update.
I grabbed some gold spray paint and started painting the legs.
I had no idea what I was going to do yet.
But once I started painting I got in the groove.
I painted the wood part of the base a nice mint green and then started
on the bench.
I painted the bench a cream color and found some cool coordinating 
fabric to pull it all together.
Now to the not so perfect addition. In my attempt to recover this bench
I learned how to do the special BACK covering. I thought it went pretty good but
the nail head trim went in a little crooked. 
But like I said this is a NOT so PERFECT post!


 Here it is. The finished set...
The not so perfect...
finished set.
I hope you enjoyed this post.
Thankfully someone else enjoyed this because it sold pretty quick
after I brought them into the booth.
Well that was the first of our 
NOT so PERFECT posts.
I hope you enjoyed.
Until next time.
Go make someones day Beautiful!

http://diyshowoff.com/2015/03/15/that-diy-party/Furniture Feature Fridays

Tuesday, March 29, 2016

Old Coffee Table turned Upholstered Bench


Running around like a chicken with its head off, so I am hitting replay on this old post!


Hello again my Beauties!
I have another fun makeover for you today.
I have had this coffee table sitting in my garage for 2 years...
Shhhh don't tell my hubby I admitted it.
He gets a bit perturbed when projects sit and I don't do anything to them for a while. 
This one had confounded me. You see, coffee tables are not HUGE sellers around here,
let alone, long 70s fake laminate top coffee tables.
Now I know I could have simply painted it and tried to sell it as a coffee table,
but I knew it had a better purpose.
I just had to figure out what it was.

Well;  INSPIRATION always seems to hit me when I have about 10 other projects going on
and this project was no different.
I was working on another (5) projects when I had a face palm moment.
(actually I was moving my craft stash and found my batting and thought DUH...
Lets make it a bench!
So I unscrewed the top of the table from the base and got to work.

Once I had the top off, I grabbed my fabric batting, cut it to size and started 
stapling it to the board.
Once I had my batting stapled with it curving around the edges to make it soft all the way around 
I got to upholstering my fun fabric that I had picked out.


For those that ask "HOW", I say its like wrapping a present.
I pull the one side and staple it down, making sure to keep it in line;
then do the opposite side pulling it taunt as I staple it.
Then you go to the others.
When you get to the corners you carefully fold it in being careful not to bunch
and lay it nice and flat then staple it. 
After I was done with that I went on to painting the base.
I chose a nice neutral gray to go with the fabric.
I think you will agree...
It looks much better as a Bench than it did as that dirty old coffee table.

I hope you enjoyed this latest makeover!
Until next time...
Go make someones day BEAUTIFUL.

Tuesday, February 2, 2016

Fixer Upper style Painted Pub Table Makeover


 Welcome back my Beauties!
This makeover has been a long time coming.
As you can kind of see from the little picture I completed this way
back when the grass was still green and there was none of that white stuff on the ground.
Back in OCTOBER..YES....OCTOBER I made over my basement which you can see HERE
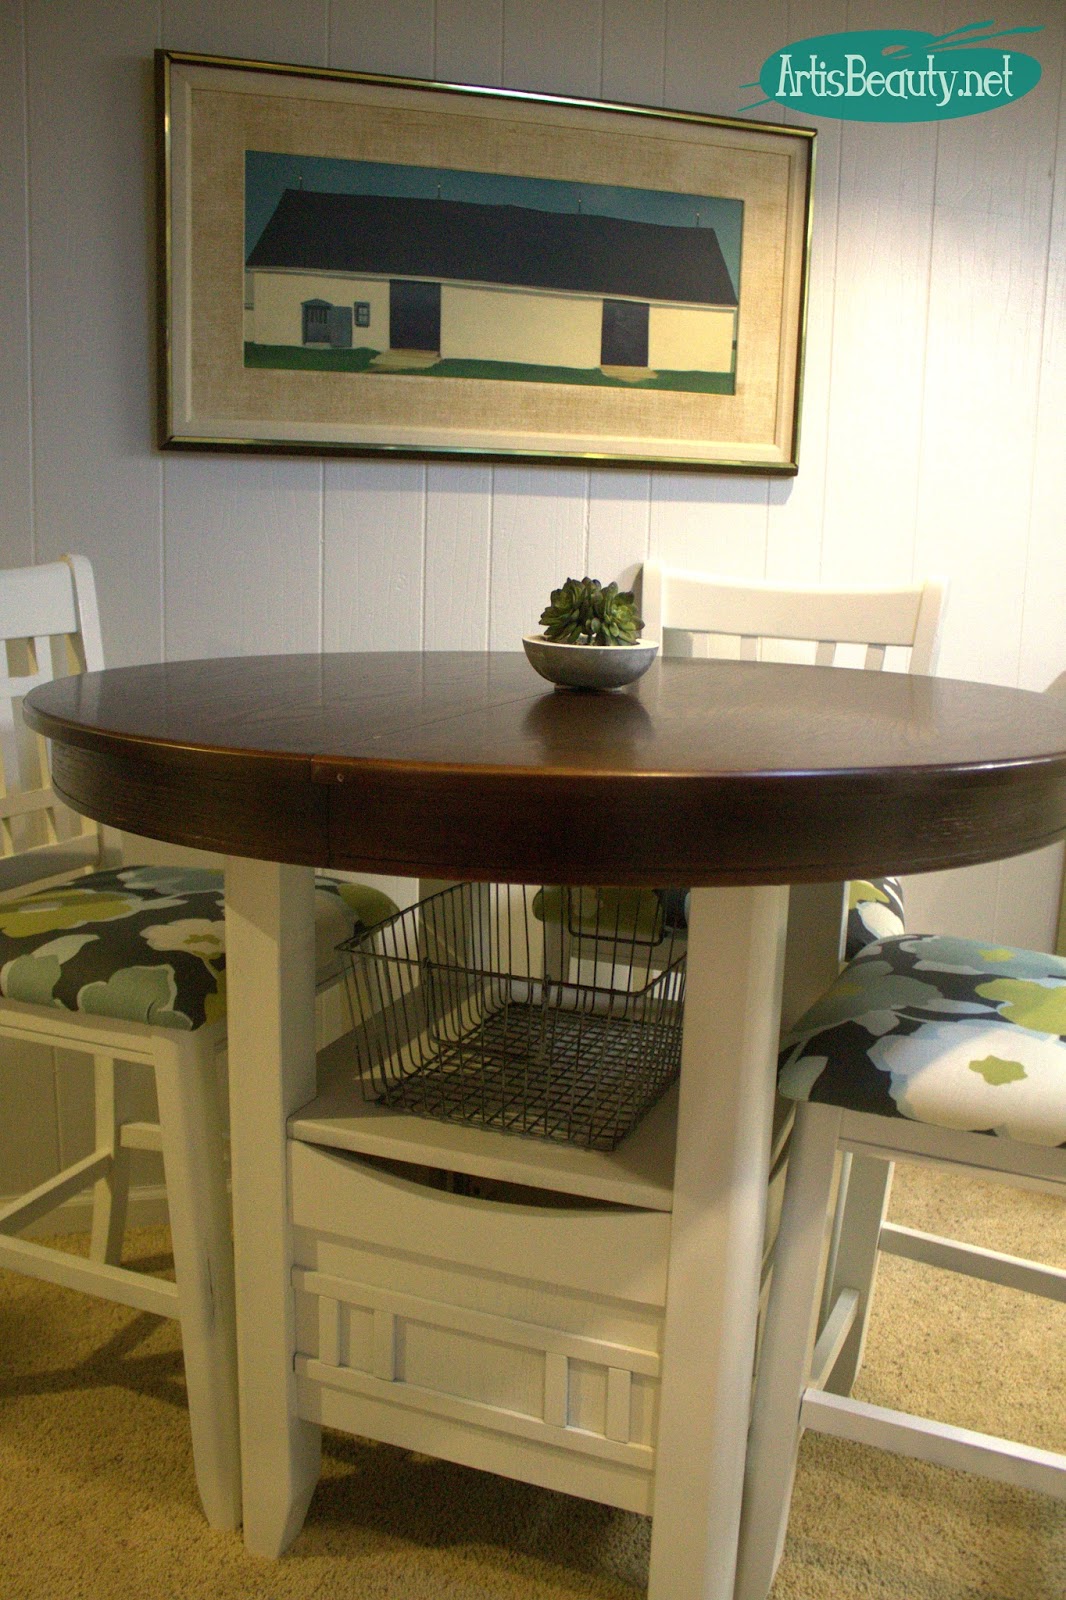
and part of that makeover was this Pub Table set.


The ever awesome Adrianne from  Happy Hour Projects
sweetly messaged me one day saying she was cleaning out her garage and if 
I wanted to come pick it up, it was mine...
I heard angels...do you??? ..:)
It was this point that I was deciding what I was going to do to the basement .
My idea to have a table down there for the kids to do homework instead of sitting at the kitchen table yelling at the other kids for bothering them while they worked was formed.


First things first, the table top needed to be sanded and stained.
I did that and sealed the top with poly so that it could take the abuse of the kids doing homework 
and eating at it. (I forgot to take pictures of that part..but hey..I had like 5 projects going on at that time)
 The next part was the fun part for me.
 made quick work of spraying 4 of the chairs with some antique white enamel paint.


While the chairs were drying and in between coats I quick ran to Joann fabrics and bought this awesome and fun floral graphic fabric.
I used my staple gun to attach it to the old chair seats.

Once everything was dry, it was time to put everything back together again.
I even added a little industrial wire basket
 underneath should the SPIRIT ever move them to put their crap away!
(let me just say..its been a few months and the only thing in that basket is my HOPES AND DREAMS of them putting their stuff in their!) :)

I will say I am thrilled with how it all came together and how nice it is to have the kids do their homework downstairs and not have as much paper work dropped on the kitchen table as they walk in the door from school.
Plus on Movie nights it great to have the kids be able to eat at a table while watching a movie as opposed to them sitting on the couch dropping food everywhere!
I am so thankful to Adrianne for her gift of her old table.
It has served a great service to our family and I couldn't  be happier.
NOW, if I could just get them to use that dang basket!
Oh well...you win some you loose some.
I hope you all enjoyed this makeover even if it took me a few months to getting around to posting about it!
Until next time,
Have a BEAUTIFUL day!