Showing posts with label recycled. Show all posts

Thursday, September 20, 2018

Roadside Rescue Vintage Bicycle Advertisement Dresser


This post is a sponsored post or  uses affiliate links to help you find the products I trust and love
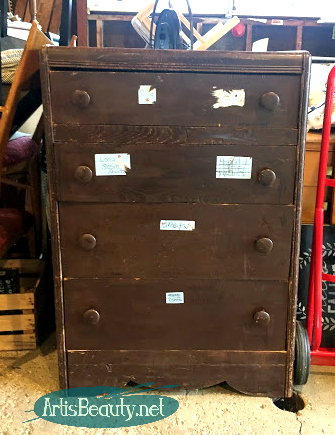

roadside rescue dresser before given vintage advertisement stencil makeover


Welcome back my Beauties.
I hope your week has been treating you well so far.
I am working on makeovers and even redoing a dresser for my husband now that the kids are back to their school schedules.
But this dresser I did this summer.
One day my husband was out walking the dog and saw the neighbors had thrown out this dresser. 
I must admit, I have saved many pieces but I was a little nervous about this one.
It was pretty beat up and I almost thought about just not doing it.
But I decided there was no harm in trying to bring this baby back to life.
First things first was I stripped off those nasty stickers stuck to the front of the drawers.
Once I started cleaning off the stickers I realized that with a good scrubbing and sanding the original wood grain was starting to show through. It was almost as if they had used too dark a stain and it just needed a lightening up.
At that point my motivation was in full gear.
general finishes driftwood water based milk paint vintage bicycle advertisement dresser makeover
I decided to use my General Finishes Driftwood gray for the base of the piece. 
The sides of the dresser were beyond trying to sand down and I figured the paint would help the drawer fronts POP
general finishes snow white milk paint vintage columbias bicycle vintage advertisement dresser makeover

Plus I had decided to go FULL VINTAGE on this dresser, with my Vintage Columbias Bicycles advertisement Stencil and figured that would pair nicely.
I used my General Finishes Snow White Milk Paint for the stencil.
After it was all dried I gave it even more light distressing and put the old hardware back on. 
free roadside rescue dresser turned vintage columbias bicycle dresser upcycled recycled pope mfg. co. BOSTON
I LOVED how it turned out!
I had surprised myself that I was able to save it and that 
I actually thought it looked good. :)
vintage dresser makeover before and after columbias highest grade catalogue free pope mfg. co 77 franklin street boston
With the old original wood and vintage advertisement I just felt like it was a match made in heaven.
vintage columbias highest grade bicycle advertisement dresser roadside rescue makeover recycled upcycled stencil before and after veneer
Plus I am happy to say that someone else did too.
It SOLD and I am so happy to have saved a piece from being crushed and dumped in a landfill.
I think I will try to remember that the next time I see a piece sitting on the side of the road and I start to doubt that it can be saved. 
I don't know why I doubt myself?
I mean you can see HERE all the free pieces I have rescued!
https://www.artisbeauty.net/search?q=roadside+rescue
You would think I would be used to saving them by now.
I have yet to chuck one in the fire pit, so here's hoping that I can keep up with saving all those stragglers that the husband brings home with the proud little smile on his face. :)

before and after vintage columbias highest grade bicycle advertisement dresser roadside rescue makeover recycled upcycled stencil before and after veneer
Well, I am off to try to work in the garage if the mosquitoes don't carry me away.
Wish me luck!
Until next time,
Have a BEAUTIFUL day! 


Thursday, August 11, 2016

Old Kids Loft Bed TURNED Rustic Vintage Style Coffee Table


This post uses affiliate links to help you find the products I trust and love
Welcome back my BEAUTIES!! 
I am sorry that it has been so long since I have had a new post for you.
To say the last few months have been busy and stressful would be an understatement.
Now I normally live a very busy life anyway but the last few months we were on overload.
You see, in addition to our normal CHAOS my Sassy Pants Momma got very sick.
(if you follow me on Instagram or Facebook you know how much my Momma means to me and how Sassy she really is) :) 
We have basically been living at the Hospital or her home for around a Month give or take a few GOOD days when she was O.K. 
Even though I still was trying to cram in projects to fill my booth I had ZERO energy to Write, Edit or POST about them. 
I have always loved my Job because it allows me to always put my family first and this was a prime example of that time. 
I am happy to say that although she is not 100 percent back to her normal sassy spunky
self yet, she is starting to come around. 
So I am sorry that I have left you all for such a long period of time,
but I have my fingers and toes crossed and I am praying that my Momma gets better and I can get back to showing you my latest projects. (I have like 4000 in my photos) :)
So lets get started shall we. 
In the middle of all the Chaos with projects and my Mom, we were also right in the middle of finally making over my sons room. He is going to be 12 and his room had never been made over since it was his nursery.
This was the summer we transformed it.
(another project that is in my pile to show you)
One of the things we were changing was his bed.
Its an old Loft bed that I got thrifting a few years ago.


Well we started disassembling it and I had a brilliant idea!
We were going to be repurposing  part of the bed into a new bed for him so we couldn't really SELL the parts. 
You know how I HATE to throw anything of use out as well.
SO we started thinking...What could we do with all these left over PARTS??


 Then my husband said...TABLES!!!
The long shelf part was left from under the loft and the legs were cut off from part of the frame so my husband sketched up some plans close to what we did for our outdoor coffee table.
 You can see he built it close to the same style as our Outdoor DIY Custom Built Farmhouse Style Coffee Table

He build this and another end table and used the other parts to make an apron for a farmhouse dining table which I will also be showing you sometime down the line.
That table top was part of the shelf under the bed and the legs were part of the base of the bed with the apron being made with parts of the old guard rail.
Once it was together I took my Rockwell sander and sanded the top making sure I really sanded some spots so the stain would darken there and give it an aged feel.
Once it was sanded I used my General Finishes Java Gel to stain the top and then applied my General finishes High Performance sealer.
 For the legs I mixed up a custom mix mineral paint in a vintage mint color and slightly distressed them.
And this is what it turned out like.
I was such a rush to fill my booth that I never even got a chance to photograph the end table but I am sure you can picture a smaller more square version of this piece :)


Here is a shot where you can see the spots I sanded "EXTRA" and how it added to the rustic feel. 
Luckily I didn't have to beat up the top to much to make it feel vintage since my BOY did plenty of that with his legos and other toys. :)
So there  you have it...
Where I have been...and
What I have been doing..
Hoping and Praying that things calm down a bit
(who am I kidding..that never happens here :))
I hope to be back with you again soon with many many more projects and with reports of good health on my momma.
Until next time,
Go make someones day BEAUTIFUL! 


Tuesday, January 19, 2016

EASY DIY Recycled Wine Barrel Stave Coffee Mug Holder


 Welcome back here my Beauties.
I have been working hard to get back into the blogging routine since the kids have 
gone back to school after Christmas Break,
but the routine seems to be avoiding me. :)
I have been working like crazy completing projects and even PHOTOGRAPHING them,
its just the process of editing and writing that is holding me up.
SO this isn't a fancy schmancy post, just a fun project for me that I completed over Christmas
and quick snapped a couple pictures of.
No crazy photo shoot or anything,
just something manageable that I knew I would be able to get a post up on. :)


Let's get on to the DIY now shall we?
As you may or may not know we are homebrewers.
My hubby has been brewing for almost 20 years.
Its become quite the family affair and even his brother has been brewing for a while.
I mention his brother because this is where we got our Wine Barrel staves from.
His brother had brewed and used an old wine barrel and when the barrel was done with brewing use,
he had decided to make it into a coffee table. Well, he only needed 1/2 a barrel for that and he 
ever so kindly gave me his left over scraps.
Now when you cut a barrel in half it falls apart. (I had pre warned his brother when making his coffee table he would need to screw the metal rings into each stave before he cut in half, so no worries...his half stayed together) 
So I was left with all the stave pieces.
I knew I wanted to do something for my kitchen but deciding was the hard part.


 I finally decided on a coffee mug holder because
A.....I LOVE coffee and
B....I LOVE wine...
so this seemed the perfect marriage.
I started by sanding the top and the back of the stave.
(the inside of a barrel is charred to help age wine and bourbon..etc...
but it doesn't smell to great when you have fermented fruit smell hanging on your wall)
So after sanding the fronts and the backs I sealed both sides with poly...
One, for the shine on the front, and Two to keep the old smell away.
 After both sides were dry, I just picked up my Cup Hooks
 and decided how I wanted my placement.
I made sure to leave enough room to be able to fit the mugs on the hook without hitting each other.
 I drilled a small pilot hole where I would just then thread my hooks in.


 Here you can see the hooks all lined up ready for me to put the wall hanging hook on the back
 Now she hangs in my kitchen with my pretty white coffee mugs ready to be filled with hot coffee and cocoa for the long winter.
This was one of the easiest DIY projects I have done in a while.
In fact it took me longer to type this up and edit the pictures than it did to create my 
Wine Stave Coffee Mug holder.
But I love it as much as my bigger projects.
I hope you enjoyed it 
as much as I am enjoying having it.
While I am here I would also love to ask you a HUGE favor.
I am in a contest over at Furniture.com blog 
and I would LOVE a vote for my dresser.
All you need to do is go down to the comment section HERE 
and vote #1 for me if you like my dresser makeover.
I am never a fan of contests and they make me nervous
but I always feel like I have to at least try a little.
So  if you do vote for me..Thank you very much.

Until next time,
Go make someones day Beautiful!

Saturday, December 26, 2015

Art Is Beauty Favorite Posts of 2015


diy painted furniture artisbeauty.net karin chudy art studio artwork paint do it yourself best of farmhouse style chic fixer upper
Welcome back my Beauties!
Today I am going to show you my personal
favorite posts of 2015.
I normally wait another week or so to share, but I figure just like
me you guys are going to be Busier and Busier leading up to the New Year,
so I would show them to you now.
(kinda like opening a Christmas present early!) 
Its always fun to do this post because I get to walk down memory lane and see all the work
I put in this last year.
Sometimes I forget how much I have accomplished in a year,
and this is a nice little reminder.
So here they are, in no particular order.
Choosing a favorite of a bunch of favorites just seems too overboard. :)

#10


#9


#8

#6

#3
 Before and After Creating my Art Studio!

 So there you have it.
I had so much fun this past year,
and I can't wait to see what the NEW YEAR brings.
I want to thank you all so much for 
joining me on this wonderful adventure
of mine and always being so Kind and Thoughtful with 
your comments.
I hope you all have a Beautiful Holiday Season!


 http://southernhospitalityblog.com/

Sunday, December 6, 2015

Home for Christmas REclaimed REpurposed REcycled Christmas Tree DIY


This post uses affiliate links to help you find the products I trust and love
scrap wood reindeer christmas tree reclaimed country living magazine feature


Welcome back my Beauties!!!


I am going to show you how to make a Reclaimed,
Repurposed and Recycled Christmas Tree from
Stuff you have laying around the house.


Now you all know I have a stash of wood scraps that I save for JUST SUCH AN OCCASION..
If you don't you could always go find some free pallets and cut them apart, or improvise and make this with trim wood or you can buy SHIMs and make a smaller version. As for me I had this leftover from the Farmhouse Coffee Table I built.
 Gather your wood scraps and your saw.
I used my Rockwell Compact Circular Saw,
but you could use a hand saw if you have the muscle for it :)
 Then line up your boards making sure you cut your tree so it fits on the support board.
Get out your straight edge and pencil to draw your cut lines.


Now for the FUN part! TIME TO CUT..Grab your safety glasses and START CUTTING!
The reason I chose my Rockwell Compact Circular saw was because it can STILL cut through these thick boards even with its smaller size. No big bulky circular saw needed and its light and easy to guide.


Once all your boards are cut line them up and you are ready to screw them in.
I forgot to take the picture, but all I did was flip this over and screw in my support board to the back of the tree boards. 
 
 For the base, I simply made a little support stand with the leftover scrap wood and some metal brackets I had in my tool box.
 Once that part is done you can start painting what ever color your heart desires!

Since this is a Reclaimed and Repurposed and Recycled Project,
I threw in some decorative stuff I had from other projects.
I had these little metal stars that I had picked up at goodwill for some Christmas signs last year, and that fun little Reindeer was from the Dollar Tree and was leftover from decorating my booth at CHANGING THYMES GRANDVILLE
I didn't have to buy anything to make this project.


 You know FREE is my FAVORITE Four letter F word! :)
Be sure to check out the links below for lots of AWESOME #homeforChristmas posts from tons of talented bloggers!
christmas diy craft build it yourself recycled wood dollar tree reindeer do it yourself