Showing posts with label christmas. Show all posts

Thursday, November 30, 2017

Graphics Fairy Sheet music wreath using OLD CD


I love resharing this wreath!
Come see how easy it is to create your own!
(You can follow me on INSTAGRAM to keep up with what I have been working on) so I thought I would share an Oldie but a Goodie!
Here is one of my favorites. My sheet music Christmas wreath.!
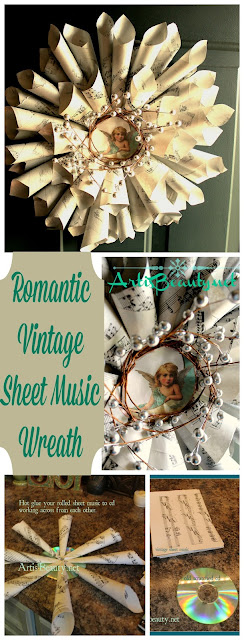

diy craft vintage sheet music turned christmas holiday wreath
Good Monday Morning my Beauties! Well Its official...
I have caught my kids CRUD. :(  Luckily
I had gotten this project I have been wanting to do done
before the wonderful virus set in.

I have a stock pile of old sheet music that I had gotten at a bag at a thrift shop for $1.
Some of its really old and I decided not to touch that stuff, but the rest is 70's and 80's classical.
So I thought I would use those to make my wreath. BUT I didn't have a wreath form. It hit me while
I was in my CRAP/CRAFT room that I have a bunch of old scratched Cd's in there.
They are round and sturdy and I thought an added bonus that a MUSIC wreath was going to be put on an old CD :)
(Bonus if you don't have sheet music you can go over to the Graphics Fairy and
she has vintage sheet music you can print off)

I started rolling my half sheets of sheet music and hot gluing them when they were rolled.
I then hot glued them to the CD working in a opposite pattern. (kinda like how you take the lug nuts off a tire..:))

I kept adding layers and then as I wanted it fuller I cut the half sheets in half again and made a middle smaller rolled section. When that was set I went over to the Graphics Fairy and got this cute little Vintage Angel

I added her to the middle using my hot glue gun and then used a piece of some silver sprigs that I had left over from Christmas Decorating.
copied vintage sheet music craft old cd hot glue gun graphics fairy christmas holiday wreath decoration
My Christmas Sheet music wreath now hangs on my front door.

I love the adorable little greeting that she is to people coming into our home.
Well, thats all I have for today..Hopefully by the time you read this
I am on my way to feeling MUCH better.
I hope you all have a BEAUTIFUL day!
Posted by Picasa
 The Graphics Fairy

Friday, November 25, 2016

The DIY'ers DREAM gift guide! Naughty or NICE!

Need Gift Ideas for yourself...??
Have a spouse that always says
"you never tell me what you want"!
Family and friends wondering what a DIY'er would even NEED????
Send them this Post and have them Making a List and Checking it TWICE!
I have made your list for you!

This post contains affiliate links which will direct you back to the products I mention.  If you choose to purchase them, I will receive a small commission but it does not cost you anymore to purchase it through the link.


 Hello my Beauties!

I have a fun post for you guys today!

I have rounded up all of my MUST HAVES that I use 

constantly in my DIY life.

These are items that all have helped me save time and got the job done when I needed it.

SO start making your list and checking it TWICE!

 The first item is the

Silhouette Cameo

 I will admit I was nervous when I first bought mine. I worried if this was going to be worth the money.

I will tell you and anyone who has learned to use theirs will as well...YES! 

I use this to make signs, decor for my family

and to create stencils to use on furniture,

like my HOME BENCH

 and my MILK AND CREAM table makeover

That Silhouette Made short work and transformed 

these pieces into quick sellers.


 NEXT...

My

 Rockwell RK3441K Compact Circular Saw

You know how sometimes you need to quick cut something and you don't want to pull out the table saw or miter saw.
Yeah...this baby makes it so easy to zip a piece a wood in half.
I would show you a picture but I have another post coming up where I use this so I am gonna keep that baby on the back burner ...:)

NEXT
I just used this on another big project that I can't show you yet, but I can show you my cute little Feather Table I did.

I literally took me about 2 minutes to spray the whole piece. See all those little round insets?
Do you know how long that would have taken to paint with a brush??  A lot longer.
 So my Homeright sprayer is a MUST HAVE.


Black & Decker LDX112C 12-Volt MAX Lithium-Ion Drill/Driver

I don't need to show you the projects I have used this on because pretty much in every post you will find this baby laying around the project.

I have owned a couple drills and this baby has been the one that outlasted them all.

I have the double battery pack so when one dies I just clip in the other. It also has a tiny light when you start drilling so you can see what you are doing.

You know when you are screwing in those ding dang teenie tiny screws and you can barely see them. This drill helps so that you can see what and where you are drilling.

Honestly I couldn't live without it.

I actually rant when I can't find it and have to use a different drill..(that might get me put on the naughty list ...:))

Next up on the must haves is my

Rockwell RK4246K Random Orbital Sander 2.8-Amp Cyclonic Dust/Air Separator and Carry Case

I have used other sanders before with the little bag on the end of them..that do NOTHING.... 

You know the ones that just basically filter the dust into the air....NOT THIS BABY..

I just used this the other day and as always was flabber gasted by what it collected in that little container.

For once I wasn't covered in dust!!   

 But if you don't have one please ALWAYS be sure to have a

Toxic Dust Respirator

I can't urge you enough!

I have worn mine for years!

It doesn't look this pretty anymore, but when ever I am making a mess the first thing that goes on is this and my safety glasses.

I know so many people who have worked around harsh chemicals and particulate that suffered later  in life including my grandfather who died of black lung from being a Furniture Rubber (it means he rubbed on the stain and finish) 

There was no safety back then, but there is now and there is no REASON not to wear one. 

I mean this baby is even CUTE..

So please...be on the NICE list and get one of 

these Particulate Respirator masks

Your family will thank you down the road.

and LAST BUT NOT LEAST....

The one thing every DIY'er can't live without..

a PURDY Brush


   Yes..there are other brushes..but once you use a PURDY you will know why people love them.
They are like the diamonds of the DIY world.
Coveted by brush lovers..
(this means you clean them right away and don't let them sit a bit like you do your old ratty brushes)
(see, I am getting on the naughty list again for not taking care of my stuff) :)
SO that is my MUST HAVES List.
I am sure I could have found more, but I know everyone is busy and want to know the basics.
So now you have them.
I hope you all have a wonderful Holiday 
Season and enjoy your DIY'ing time.
See you tomorrow with another DIY makeover!!


Monday, November 7, 2016

DIY Vintage Driftwood Shiplap Copper Christmas Signs.


wood joy and noel cut out words diy craft target

Welcome back my Beauties!
Its beginning to feel a lot like CHRISTMAS!!
Just kidding...its not..
and most likely this will be the ONLY Christmas decor post I do.
Plus I usually don't do them before Thanksgiving just on a personal principle but I will be gone for 2 weeks in Florida
closing down my moms house there, so we can sell it now that she is gone.
I figure I am not going to feel Real Christmasy when I get back 
from there and I will be getting home only a few days before Thanksgiving.
Being gone that long will also mean that I have to play MASSIVE catch up back home once I get back.
So that means I will be in Furniture painting BEAST MODE for the store. 
So there is you reasoning for my EARLY Christmas post.
(also if you could say a little prayer or send some good vibes my way, I am VERY VERY nervous and sad about closing down my moms house. If you have been following me all these years you know how many memories we have with my momma down there.
This will be the very first time I step on her porch and not have her there to hug me. It will also be the last time we see the place as it will be up for sale and will all take place while we are back home.)

Now that I got that off my brain, lets move on to the project. 
joy noel vintage driftwood shiplap diy craft christmas sign
You can see me here measuring how much room I would need for each word before I cut the boards. I used my AIRSTRIKE to nail the two ship lap pieces together.
Way back this summer, we were at our friends property on Lake Michigan. As is our usual we walk the beach looking for driftwood.
The kids run ahead and see if they can find any good pieces for MOM.  Well this year we found a bunch of sea grass rolled up in balls on the shore and in between them washed up were a bunch of broken pieces of vintage shiplap! Somehow they had floated ashore on the beach and I was glad to do a little beach cleanup and take the driftwood shiplap home with me.
When the kids asked me what I was going to do with it,
I casually said..."Oh, I will probably end up using them for Christmas signs" .

makita mitre saw vintage driftwood shiplap diy christmas signs joy noel coppe

Fast forward 4 months later and I am shopping at Target in the dollar spot and they have these cute little cut out wood "JOY" and "NOEL" signs for just a few bucks. 
My brain went into create mode and said.."SHIPLAP"
I got home grabbed my shiplap and got out my Mitre Saw
and cut them into the size I needed to fit the words.
devine color valspar radiant metals copper spray paint christmas signs joy noel vintage shiplad driftwood craft diy
Then I grabbed my copper spray paint and sprayed both of the words with it.
While those were drying I dry brushed my driftwood pieces so that the copper wording would pop.

ryobi airstrike brad nailer valspar spray paint diy christmas shiplap signs copper craft

Once everything was dry I used my Ryobi Airstrike nailer to attach them to the driftwood.
vintage driftwood shiplap copper joy christmas sign diy karin chudy artisbeauty craft airstrike
I love how the copper is so warm against the worn whitewashed ship lap.

Driftwood shiplap vintage copper noel christmas sign glitter sparkle home decor diy crafts
I had made these to sell, but I am kinda in LOVE with them,
and I am thinking I either need to make a few more or just keep it. 

noel and joy vintage driftwood shiplap christmas signs diy artisbeauty copper spray paint makeover airstrike nailer
 Here they are sitting on my mantle. 
Which honestly might be as decorated as it gets this Christmas.

driftwood vintage shiplap copper christmas joy noel signs handmade artsibeauty karin chudy spray paint dry brush
I hope you enjoyed this fun little Christmas Craft.
Hopefully, things go well in Florida.

Until next time, 
Go make someones day BEAUTIFUL.

Tuesday, December 22, 2015

Easy DIY Holiday Chalkboard Sign~Home Expert Series~

Welcome Back my BEAUTIES!
If you are still running around like me getting ready for guests,
here is a quick and EASY way to add some Fun Holiday Decor before
your Guests come!

So JUMP  on over to FURNITURE.COM to see how I used this Rustic Thrift store
Chalkboard and Transformed it that to
THIS!