Showing posts with label outdoor project. Show all posts

Friday, March 31, 2017

Roadside Rescue Free Russell Woodard MCM Patio Chair set Spray Painted Makeover


(hitting replay of one of my favorite makeovers that I kept) 

Hello again my Beauties!
(UPDATE...thanks to an awesome reader I found out these are Highly collectible
 Mid-Century Modern SPUN Fiberglass Russell Woodard Chairs....I am so glad I kept them) 
I have been meaning to show you this makeover for over a month now.
I was going through some pictures on my computer and realized I never showed you
this makeover.
 One night over a month ago on a walk we came across three of these chairs for free on the side of the road.
Well...as a SUCKER for FREE furniture you know I picked them up.
The one above went to my booth but the other 2 were going to be mine.
They just needed a little WORK.
 Here is a close up of the wicker and cushions before...
They were kinda....well...YUCK.
The cushions were dirty and out dated and the wicker had lost parts of its old paint job,
but the chairs themselves were oh so COMFY and I love the cool style!
 
I quickly gave the chairs a couple coats of Black Spray Paint and got to
work on the chairs.


 Now I tried to be FANCY with the cushions and use this fancy dancy special spray paint...
Well, as you can tell..NO, it didn't work.
The plastic mesh type material was no match for the expensive fabric spray paint.

So I went with my favorite standby!
I grabbed a couple cans of my favorite Rustoleum spray paint and gave the cushions 2 coats.
It worked perfectly.
I mean..why had I gone through all that trouble before I tried good old spray paint?

 The nice part about forgetting to post is that I can tell you..
the spray paint has held up FABULOUSLY. 
No flaking..No Peeling...They look as good as they did the first day.
I love them and we have been putting them to good use while
we FINALLY enjoy some nice weather here in Michigan!
Until next time;
go make someones day BEAUTIFUL!

Thursday, July 21, 2016

Small Outdoor Table Makeover ~DIY Furniture Girls


This post uses affiliate links to help you find the products I trust and love

Welcome back my Beauties!
I finally have a new post for you guys today!

Every Month we have a Themed Furniture Makeover Day with 
a bunch of my Bloggy Friends and TODAY is that day.


This months THEME is OUTDOOR.
Now with how busy we have been here I wasn't sure I was gonna be able to make it.
I was scrounging all the thrift shops and NO ONE had any outdoor tables and anything 
I could makeover.
But then I walked into my own backyard and found one :)
This table kind of just blended into NOTHING back there because it was so sun damaged and 
worn out that I really never noticed I had it sitting by some chairs around our fire pit.
So I decided then and there that I would bring this piece back!

I grabbed my Chalky finish Americana Paint and gave it two coats.
I also used a little dark stain to warm up the worn out wicker on the top.
Since the paint wasn't outdoor paint I knew I had to help protect it from the elements with something.
My goto for that is Minwax Helsman Spar Urethane
It comes in spray form so I just sprayed the whole piece down after distressing it and 
it was ready to go BACK outside!

Here it is, back where it belongs, making a little bit more of a statement now.

I think you will agree that, a LITTLE bit of paint made a BIG difference.

Now head on over and check out all the outdoor project
by all my other bloggy friends for some Major Outdoor Inspiration!

Tuesday, April 5, 2016

~~Home Expert Series~~DIY Vintage French Flower box from Pallets.

Welcome back again my Beauties!
Its time again for Home Expert Series!
This week I am going to show you how to use some food grade pallets


You can take these plain old boards and turn them into a cute vintage Flower Box
Come on over to Furniture.com to see how it easy was to create this!
Until next time,
Have a Beautiful day!

Wednesday, September 16, 2015

Back to School Deck Makeover ~~~ AFTER...finished makeover!


I have received product in return for this post. All opinions are mine and mine only. I would never write that I "liked" something if I didn't. Above all my readers are what matters and I owe it to you to keep it REAL.

 Welcome back again my Beauties!
I finally can show you the Deck Makeover now that it finally stopped raining..
Every....Single...Day...for the last few weeks.
You may remember the BEFORE post HERE!
Well now its time to show you the AFTER!

I even made you guys a little video so you could see me in the process 
of staining the deck.


As you could see in the video I was using

Olympic ELITE Advanced Stain + Sealant in One is a super-premium stain formulated to unlock and protect woods natural beauty with unrivaled richness and depth of color. A curated color palette of 14 rich wood-inspired colors utilizes only the most durable pigments for natural beauty and durability. A semi-solid provides more hide for wood with imperfections.

I chose the WENGE color and I am so happy I did.
I was BEYOND thrilled with how well this product worked.
Now I have stained my deck quite a few times in the almost 20 years that we have lived here
and I have NEVER had it so easy as I did this time.
Normally I would use a regular good quality deck stain and
for the process I would take a brush and run between all the boards and edges and then later go back over with a stain pad and finish up.
But THIS TIME..I didn't have to do that, thanks to the EXCELLENT advice from
Arvid of Olympic Stains.
When I went to pick up my stain he wanted to talk to me about the process.
I am so glad he did. He is the one who told me about this Wooster stain brush..(it looks like a wallpaper brush almost) 
It worked great, but I needed it to have a longer handle.
So I grabbed this little attachment for my 
extension pole.


I was in love..I can't believe I never knew about this.
This is the fastest and easiest I have EVER re-stained my deck.
The brush doesn't SNAG like the ole stain pads so I only had to use
one thing to stain the whole deck.
 Here you can see I had started on the side decks first. What a difference already!
I was amazed.

Here is all the decks in the process of drying.
Gotta love that Deck furniture thrown all over the yard look, don't ya!? :)
Now it was time to start putting the furniture back.
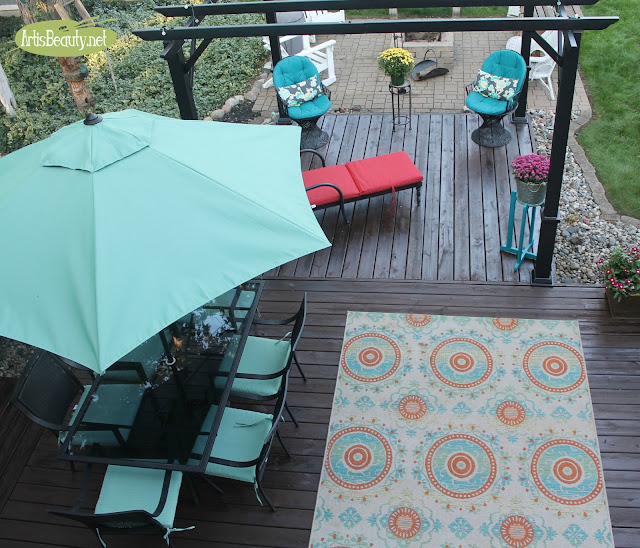
I love how RICH the color came out. 

I love how it feels like I am almost sitting in the living room with dark rich hardwood floors.
 
It plays off of our dark pergola so well too,
tying it all together. 
I especially love how it looks against the house..
seeing as it took us all summer to paint the DANG thing last summer.
You can see that post HERE.

What a difference. I just love walking out side and seeing the clean and warm dark stained deck.
I am so happy its DONE! Now I can enjoy it for the
Fabulous Fall weather we have coming our way.
My BACK TO SCHOOL project is finally DONE!
I hope you enjoyed this latest and greatest makeover.
Until next time (I will be lounging on my deck )
I hope you all have a BEAUTIFUL day!

Saturday, September 12, 2015

Back to School Deck Makeover~~~~ BEFORE

I have received product in return for this post. All opinions are mine and mine only. I would never write that I "liked" something if I didn't. Above all my readers are what matters and I owe it to you to keep it REAL.
Good Morning my Beauties!
I thought I would show you a BIG project that I have been working on over
the past few Months. :)
This summer WE/I   (..hubby really didn't WANT to do it..but KNEW we had to) 
decided it was time to re stain the decks.


as you can see from this view the deck had some major wear and tear at the entrance to the home.
6 people and a dog tend to do that :)
Now one of the reasons for my hubby's lack of excitement is the fact that there are a total of 4 decks that HE/WE built that equal over 600 square feet. 
Its a big job!
Plus the fact that we built all the decks ourselves and three of them were made from
free old decking from friends. (which meant when we built the decks we had to flip all the boards and power wash them before we could build the deck;   Meaning...We have been down this long...deck stripping and staining road before) :)
Then we added the patio with fire pit at the end of the deck.
So lets just say..
Hubby wasn't "FEELIN" this project.
:)
So I decided it would be MY project.
I would do the whole thing.
I have done it multiple times before.
We have lived here almost 20 years so I knew what I was in for.

I started by taking EVERYTHING off the deck.
All the furniture,planters, rugs, and Kids crap.

 Since the deck was so dirty along with old stain,
I grabbed my father in laws little 
Power Washer.


You can see here the difference it made.

It was pretty quick to take off all the old worn and dirty finish.

Once it was power washed it was time to replace some boards.
These boards were BROKEN..because this spring when we were visiting 
family in Florida, we had a huge storm back home.
Branches fell and landed straight down into the deck smashing holes in two of the deck boards.
We were so thankful they hit the deck and not the house.
If they were strong enough to drive holes in a deck 
I can't even imagine what they could have done to the house.!!
So now the decks have all been washed and are waiting to be stained and sealed.
A Perfect Kids go "back to school" mom project.
....
Only...it hasn't stopped raining basically now for almost 2 weeks.
I have to wait for the deck to DRY before I can move on.
(you can see from this picture that the boards are still wet with rain)
So now I have to be patient and WAIT.

But when I DO start this is what I will be using.

Olympic® ELITE Advanced Stain + Sealant in One

Olympic ELITE Advanced Stain + Sealant in One is a super-premium stain formulated to unlock and protect woods natural beauty with unrivaled richness and depth of color. A curated color palette of 14 rich wood-inspired colors utilizes only the most durable pigments for natural beauty and durability. A semi-solid provides more hide for wood with imperfections.

So...If it ever stops raining and my deck dries, I will get to show you the beautiful
"BACK TO SCHOOL" deck makeover!

Keep your fingers crossed that it will be BEFORE the snow starts to fall here in Michigan.

:)  

Until next time...

Have a BEAUTIFUL day!


Wednesday, July 8, 2015

Vintage Outdoor RETRO Rocker Makeover.


 In my recent post about my DIY build it yourself Farmhouse style TABLE

 People were asking about the CHAIR...
Well here you can see how I transformed my old rescued metal chair.

 Well Hello my BEAUTIES!
Do I ever have a fun makeover for you guys today.
I got to try some fun new OUTDOOR vintage paint and 
I had the PERFECT piece for it.


 Wouldn't you say that this chair was deserving of a MAKEOVER???
I got the chair out of my neighbors garbage.
The sad part was there was 2 of them..
I woke up one morning and it was storming out like crazy.
I went to go bring my kids to school when I spotted them across the street
next to my neighbors garbage.
The GARBAGE truck was turning the corner onto our street!
Now let me remind you..It was STORMING...
I had a decision to make...Risk getting soaking wet and possibly struck by lightning (it wasn't actually lightning out but it was booming)
Or leave them to the trash man.....
HAVE YOU MET ME???? :)
I darted across the street in the rain....Clothes now in mere seconds soaked...
all the way to my undergarments...:)
I grabbed one chair...I had one chance....The garbage man was on my heals..
I picked up my chair holding it victoriously above my head as my children stood across
the street in my driveway screaming "HURRY MOM!!!!!" 
Just as I got into my garage the garbage man grabbed the other chair and lifted it into his truck.
The other chair was gone....I, in my haste at least grabbed the better of the two..the other had rusted through holes and the bottom of the rocker rungs rusted through too.
This one was at least totally intact.
I still think about the one that got away but it was not to be :)


This is where this great product comes in to play.
You know how I LOVE color and I wanted that PUNCH of it when painting just this one single chair.
I chose Cerise.
The pigment so DEEP and RICH...
It would for sure make my vintage chair beautiful again.

 I sanded my chair just getting the loose chunks off...before that when I was working on my patio
I had actually POWER WASHED the whole thing too.
So it did a great job of cleaning and removing the loose paint.
Now it was time to start painting.
The Maison Blanche Paint Company's revolutionary Vintage Outdoor Furniture Paint is formulated with UV filters to help your color stay truer, longer. It's also permeable, allowing it to breathe and expand. Perfect for outdoor weather conditions. 

Now, you can get the sandable, chalky finish you love on your outdoor pieces, like patio furniture and planters. 
 AND

 If you need an extra hints or how too's the great thing is that 
Maison Blanche has a whole bunch of videos showing you how to use each and every single product


Once I painted my chair, I used Maison Blanches Satin Varnish
as extra protection from our crazy Michigan weather.

 Quite the difference wouldn't you say!
It definitely added that PUNCH of color I was looking for.
It goes perfectly on my newly made over vintage patio.
You can see that post HERE 

 The best part of all this is that our FALL's or AUTUMN is far better than our spring and summer.
So now I have the perfect place to have my cup of coffee in the morning. 


Make sure you stop over at all my other BEAUTIES pages and 
see what they made over with their Maison Blanche vintage OUTDOOR paint.


Be sure to check out the other Projects by my friends!
Refresh Restyle
 Bliss Ranch
Hymns and Verses
and
The Wood grain Cottage

"I received product and/or compensation for reviewing Maison Blanche Paint Company products. All opinions are genuine."
http://diyshowoff.com/category/other/that-diy-party/.
Inspiration Monday
Monday Funday Feature at Setting for Fourhttp://www.simplydesigning.net/2014/09/whimsy-wednesday-131.html
Furniture Feature Fridays