Showing posts with label Krink Paint pen. Show all posts

Wednesday, May 31, 2017

Dogwood Dresser Makeover with KRINK marker and Ce Ce Caldwell paint


Feeling a bit nostalgic today on the blog.
This is still a favorite of mine and
just made me feel happy all over.
Come see the transformation of
this plain Jane dresser into a dynamite dogwood beauty

Dogwood handpainted artwork dresser makeover Krink permanent paint pen hand drawn diy makeover

Hand painted artwork dogwood dresser makeover orange and blue compimentary colors diy before and after recycled
Can you believe that THIS beauty;

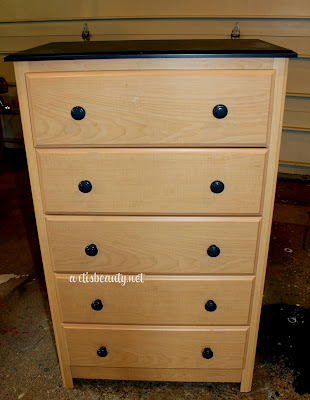
Used to look like THIS???

I saved this dresser from the big furniture dumpster in the sky!
A.K.A. the CRUSHER. It was priced at only 7 bucks at the thrift store because they were trying to get rid of it. If I didn't buy it then it meant that most likely it would go to the
furniture recycling plant which is actually a giant CRUSHER!
Oh the HUMANITY!! I had to save it!

So I brought it home and it SAT in my garage for ......MONTHS!
My wonderful hubby asked me every day; "what are you going to do with it"
I had NO idea....:) It had  become a STORAGE of sorts. Lots of things started to
pile up on top of it...It was time to GO.

So much UNLIKE the A-team..I didn't have a plan...I never do...
I just walked out in my garage and went...hmmmm..
Grabbed the paintbrush....tooled through my paints and picked out my latest fave..
CeCe Caldwells and let the FUN begin!
Look at it... better already!!

This post is a sponsored post or  uses affiliate links to help you find the products I trust and love

It was at this point that I decided to recreate my Dogwood dresser, but in
different colors. You know me...I have a hard time with WHITE and BLACK unless of
course they are in some crazy sort of pattern.
I drew out my dogwoods and then Grabbed my OH SO FAVORITE paint pen in the
whole wide world ...My KRINK 

Now I am sure you have all heard me GUSH about how much I love them and this is why!
I drew on my first coat of orange in about 10 minutes....DO YOU HAVE AN IDEA HOW LONG
IT WOULD HAVE TAKEN ME TO PAINT IT ON WITH  A BRUSH????
NOT 10 minutes that's for sure.

after going over it again in a second coat I found some old handles that I had gotten
at a garage sale this past weekend. I got a hodge podge in a ziplock bag for 2 bucks.
I found some that worked and spray painted them in the same color coral as the flowers.

http://amzn.to/2qFPMGB

I can't even believe this is the same piece of furniture.
 
Krink Markers Hand painted artwork dogwood dresser makeover orange and blue compimentary colors diy before and after recycled

It makes me so HAPPY just to look at it!

I hope you all have a BEAUTIFUL day!!
Posted by Picasa


Monday, May 5, 2014

Old Metal cabinet turned VINTAGE APOTHECARY CABINET

vintage-metal-apothecary-cabinet-with-graphic-art-is-beauty
 Good Monday my BEAUTIES!
I hope the Weekend was wonderful for all of you!
We were busy as usual with too many things
trying to fit in too little time,
but it was fun none the less.
For today's Makeover I am going to show you this
old Metal Cabinet that I had picked up off of
CRAIGSLIST

I purchased the cabinet as you see it in the above picture.
I thought..how perfect is this. 
It looked even better than the ad had shown it 
and I thought..Man...I could just throw this right in my booth as is
and it would look awesome.
But you know me..I can never leave well enough alone.
 So many ideas crossed my head as to what I wanted to put on it
but finally decided to go with a vintage "APOTHECARY" graphic.
Now I couldn't find any that I liked so I had to use my silhouette program
to create my very own CUSTOM stencil.
I created my graphic and even made a little perfume bottle 
for the top.

 After using my silhouette to cut out my vinyl stencil I decided instead of painting and then having to seal the paint to use my good old trusty KRINK permanent paint pens.
I just lightly brushed the ink in the stencil area being careful not to get to much ink 
on so it wouldn't bleed under.
vintage-metal-apothecary-cabinet-with-graphic-art-is-beauty
 Once the ink was dry I lightly sanded it to give it a slightly distressed look
and even did a couple spots on the cabinet to age it a bit.
vintage-metal-apothecary-cabinet-with-graphic-art-is-beauty
I have to say, that I kept her in my garage for a couple weeks.
Even though I had no where in my house to put her..
I just didn't want to let her go.
I finally decided last week to put her in my booth
in CALEDONIA VINTAGE MARKETPLACE
and she sold in the first day!!
Someone else is now loving her as much as I did.
(and not sitting in the garage)
I hope you enjoyed this latest makeover.
Be sure to come back tomorrow for the LINK party so 
we can see what fun stuff you guys have been working on.
Until next time..
Go make someones day BEAUTIFUL

Thursday, January 30, 2014

Outdated to ASIAN inspired Vanity Makeover

Well Hello again my BEAUTIES! 
What a week it has been here...(I always seem to say that) 
We are hopefully done with Blizzard/polar vortex/windchill/snow days here..:)
We have now had over our allotted 6 days so I don't know what the rest of the winter holds..but hopefully...No more snow days....
It has been so cold that you can't even work in the garage with a furnace...Well, at least the one I have. Luckily for me a few weeks ago, I knocked out some projects and took a bunch of pictures 
and have been saving the makeovers for when I actually get a chance to sit down and
write about them...You know...LIKE SNOWDAYS...:)

This fun makeover sat for a LONG time in my garage..I had gotten it at goodwill and it was part wood....part particle board construction. You can see the mirror that came with it in the far right corner.  It sat because I had NO IDEA what I wanted to do to her.


But as always, things kind of fall into what they are meant to be..
I have been saving this material that I got at Goodwill for a while too.
I had not found the right project for it, so it sat in my STASH.
I was cleaning some stuff out of my work room and found it.
I thought..that old vanity sitting in the garage could have an ASIAN feel.

So I took the seat of and recovered it with my fabric. Taking off the old gross dirty cream material.
I had just got a quart of CeCe Caldwells Pink Lady Slipper
and I thought the Black and Pink would go well together.
I gave it a couple of coats and waited to wax and distress.


Once she was dry I decided she needed a little more PUNCH, So I used a scrap piece of material 
and blew it up on my printer then transferred the image with some carbon paper onto
my vanity. I then used my KRINK markers to draw on my lady.

I waited till the next day to wax and buff.

I just loved how the waxing and  buffing brought out the variations.
I even had this fun little leaf knob that I had gotten at an estate sale. 
I thought it added to the feel of the piece.


Here is a closeup of my pretty little lady holding her tea.

I hope you enjoyed this makeover and I am so happy to say
that this piece is already SOLD...
which always causes a happy dance with me,
since sales have been slow because businesses have
had to close for the weather just as much as the schools.
Now Hopefully we are on our way to warmer sunnier weather..
(who am I kidding..we have more weather advisories already in affect for
tomorrow...but I can dream right...)  :)
Until next time.
Have a WARM and SUNNY
BEAUTIFUL day!.
Furniture Feature Fridays</
Nancherrow
Life in Velvethttp://www.theidearoom.net/2014/01/party-bunch-linky-party-9.html
http://diyshowoff.com/category/other/that-diy-party/. 

Three Mango Seeds

Monday, September 30, 2013

Laminate Furniture can be BEAUTIFUL too! Willow Tree Dresser


Good Morning my Beauties!! I hope you
all had a wonderful weekend!
Ours seem to just be flying by....(that's what happens when all 4 kids
are in Fall sports though)  We did finally get some down time on Sunday and
that was much needed. I didn't have time to work on any projects this weekend but over the past couple of weeks I have been chipping away at them during the week and basically like a squirrel storing its nuts for the winter, I have been storing posts. So I just have to remember that I did them and photographed them...:)
So I can write the post later....(and yes, I realize I am THAT squirrel that is digging all over the yard wondering where I buried my nuts...hahahha) But I digress....:)
I wanted to show you all that Laminate furniture can be pretty too...:)


I got this perfectly fine laminate dresser from a friend of mine. I had traded her earlier a dresser for her son, and she in kind gave me this one...It was in fine condition, minus some scrapes of the laminate  on the top and the drawer fronts...So I just lightly sanded and got to painting.

I slapped on some Omaha Ochre on the drawer fronts and some Smokey Mountain,
CeCe Caldwells paint on the base. I loved it already just as it was, but
It was a blank canvas for me....and you know I have to paint!! I
can't have a PLAIN dresser...:)

You also know how much I LOVE trees..I mean my first ever logo for
ART IS BEAUTY was a TREE..
I have done so many tree paintings and  even other tree dressers.
I wanted to soften the squareness of this dresser a bit, so I drew on a willow tree,
with its winding roots and winding branches.
'I got out my brushes and my paints and started painting on the tree in a mix of black with a little bit
of metallic in it just to give it a subtle texture.


Once it was painted on I used my KRINK metal marker to outline the whole thing
and then when that was dry I distressed and waxed the whole thing with light wax and buffed it.

I am so happy with how it turned out.

Don't be afraid to paint that laminate furniture my BEAUTIES..it needs love too..
and its a great way of keeping more stuff out of the landfills..
I hope you all enjoyed this and I hope you all have a BEAUTIFUL day.
Until next time..
Hugs
Karin
http://www.remodelaholic.com/
Posted by Picasahttp://knickoftimeinteriors.blogspot.com/2013/09/knick-of-time-tuesday-106-giveaway.html
The DIY Dreamerhttp://www.cleanandscentsible.com/2013/10/inspiration-exchange-19.html
http://www.craftberrybush.com/2013/10/the-inspiration-gallery-56.htmlFurniture Feature FridaysThe Shabby Nest]
DIY Show Off
Read more at http://diyshowoff.com/2013/10/06/that-diy-party-37/#VwG0Eq72fAoUOvZs.99